1. Install Apache Web Server on Ubuntu
$ sudo apt-get update
$ sudo apt-get upgrade
$ sudo apt-get install apache2 apache2-utils
Then enable the Apache2 web server
$ sudo systemctl enable apache2
$ sudo systemctl start apache2
$ sudo systemctl status apache2
Allow your website through the UFW Firewall (if turned on – which is recommended)
$ sudo ufw allow in "Apache"
$ sudo ufw status
Test whether Apache server is running. Open your web browser and enter the following URL in the address bar.
http://server_address
OR
https://your-domain.com
The Apache2 default index page will be displayed in case the webserver is up and running.
2. Install MySQL Database Server
Next, we need to install the MySQL database server by running the command below:
$ sudo apt-get install mysql-client mysql-serverOnce the database server is installed, it is strongly advised that you run a security script to remove insecure default settings and protect your database system.
$ sudo mysql_secure_installation Firstly, you will be asked to install the ‘validate_password’ plugin, so type in Y/Yes and press Enter and also choose the default password strength level.
For the remaining questions, press Y and hit the ENTER key at each prompt.
3. Install PHP in Ubuntu
Last but not least, we shall install PHP and a few modules for it to work with the web and database servers using the command below:
$ sudo apt-get install php libapache2-mod-php php-mysql php-curl php-gd php-mbstring php-xml php-xmlrpc php-soap php-intl php-zip Once PHP and all required extensions are installed, you need to restart Apache to load these new extensions.
$ sudo systemctl restart apache2Furthermore, to test if php is working in collaboration with the webserver, we need to create a info.php file inside /var/www/html.
$ sudo vi /opt/bitnami/wordpress/info.phpAnd paste the code below into the file, save it, and exit.
<?php
phpinfo();
?>
When that is done, open your web browser and type in the following URL in the address bar.
http://server_address/info.php
OR
https://your-domain.com/info.php
You should be able to view the php info page below as a confirmation.
4. Install WordPress in Ubuntu
Download the latest version of the WordPress package and extract it by issuing the commands below on the terminal:
$ wget -c https://wordpress.org/latest.tar.gz
$ tar -xzvf latest.tar.gz
Then move the WordPress files from the extracted folder to the Apache default root directory, /opt/bitnami/wordpress/:
$ sudo mv wordpress/* /opt/bitnami/wordpress/Next, set the correct permissions on the website directory, that is give ownership of the WordPress files to the webserver as follows:
$ sudo chown -R www-data:www-data /opt/bitnami/wordpress/
$ sudo chmod -R 755 /opt/bitnami/wordpress/
5. Create WordPress Database
Execute the command below and provide the root user password, then hit Enter to move to the mysql shell:
$ sudo mysql -u root -p At the mysql shell, type the following commands, pressing Enter after each line of a mysql command. Remember to use your own, valid values for database_name (already wp_myblog), username, and also use a strong and secure password as password:
mysql> CREATE DATABASE wp_myblog;
mysql> CREATE USER 'username'@'%' IDENTIFIED WITH mysql_native_password BY 'password';
mysql> GRANT ALL ON wp_myblog.* TO 'username'@'%';
mysql> FLUSH PRIVILEGES;
mysql> EXIT;
Go the /opt/bitnami/wordpress/ directory and rename existing wp-config-sample.php to wp-config.php. Also, make sure to remove the default Apache index page.
$ cd /opt/bitnami/wordpress/
$ sudo mv wp-config-sample.php wp-config.php
$ sudo rm -rf index.html
Then update it with your database information under the MySQL settings section (refer to the highlighted boxes in the image below):
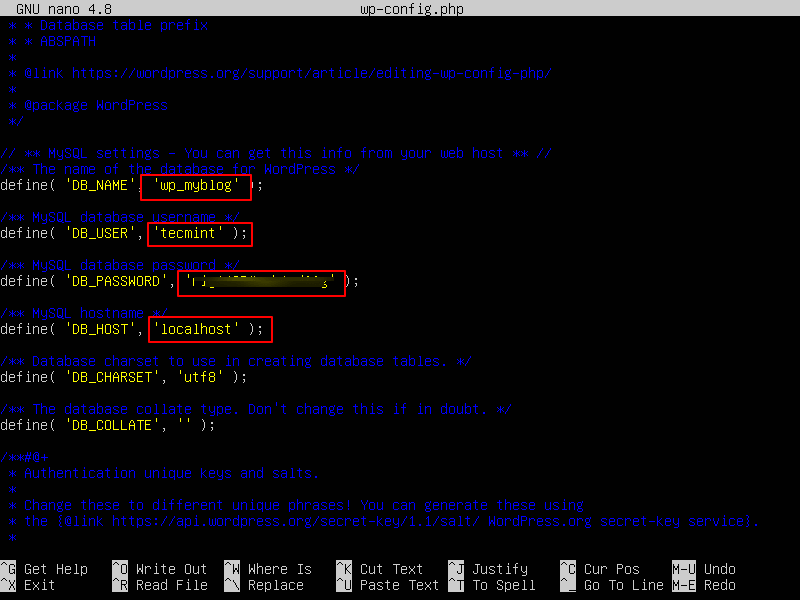
Afterward, restart the web server and mysql service using the commands below:
$ sudo systemctl restart apache2.service
$ sudo systemctl restart mysql.service
Open your web browser, then enter your domain name or server address as shown.
http://server_address/info.php
OR
https://your-domain.com/info.php
You should now be good to go with WordPress!