Objective
The purposes of this lab are to:
- Build an IoT sensor using GPIO pins for inputs
- Establish a machine-to-machine (M2M) communication protocol
- Design an IoT interaction between a sensor and an actuator.
Materials
I used the following materials to accomplish this lab:
- Wemos D1 Mini Arduino
- 1 x breadboard
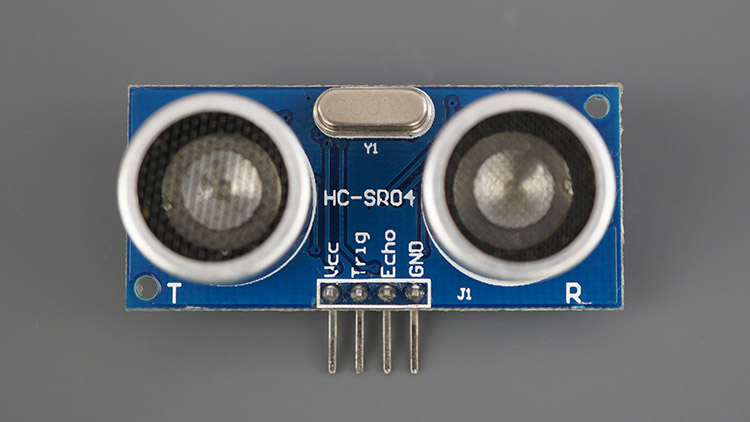
- 1 x HC-SR04 Ultrasonic Distance Sensor
- 4-8x Jumper Wires
- 1x Mini USB cable
References
I used the following resources in this lab:
- https://www.arduino.cc/reference/en/libraries/hcsr04-ultrasonic-sensor/ – The library used for determining distance from ultrasonic distance sensor.
- https://github.com/gamegine/HCSR04-ultrasonic-sensor-lib – Documentation on how to use the above library
- https://randomnerdtutorials.com/esp8266-nodemcu-http-get-post-arduino/ – Tutorial on how to make web requests on ESP Arduino boards.
- https://cyber-engine.com/index.php/projects/2402/ – My writeup and code on how to create web server stoplight used in this system
- https://1drv.ms/w/s!Ais81h0TsK5NhqEUuevEs8zMavzLag?e=hdaL2m – Todd Berrett’s example write-up
Procedures:
- Install Arduino’s latest IDE
- Install the ESP8266 core library as a remote repository in Arduino IDE.
- Install the HCSR04 ultrasonic distance sensor library in Arduino IDE.
- Verify which port your Arduino will be using once plugged into the computer with Device Manager (if on Windows)
- Model the functionality, logical flow, and components of the system. Include a schematic diagram.
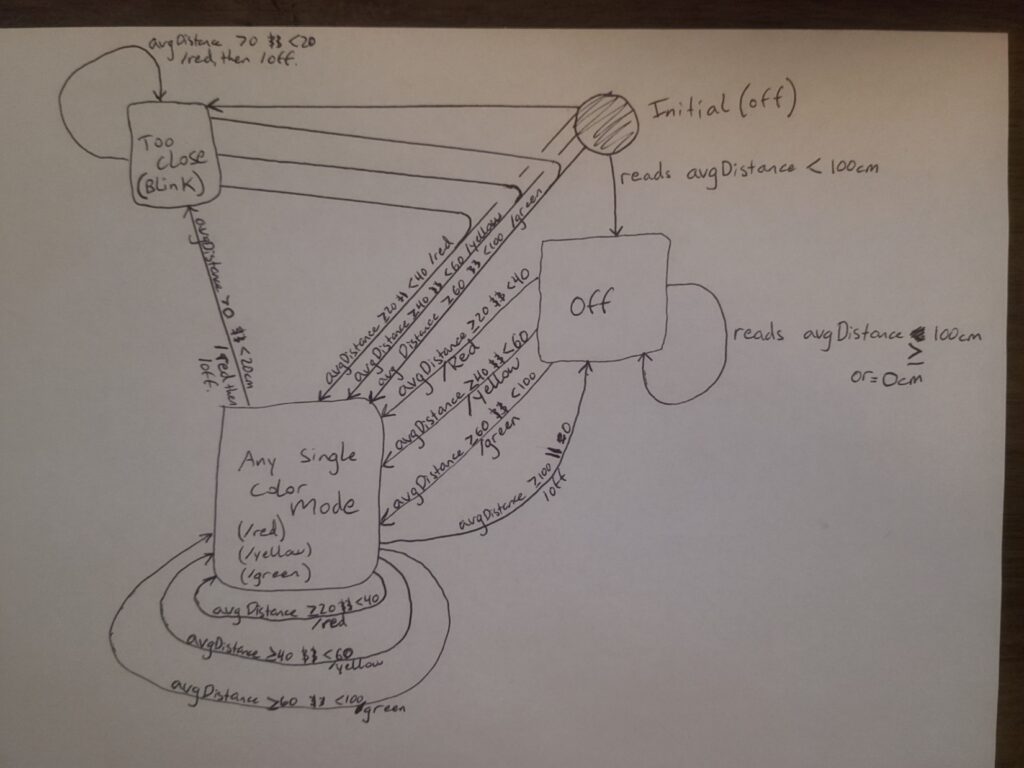
- Functionality – This system is a basic state machine, represented by the state diagram in the appendix
- Upon startup, the machine will connect to Wi-Fi, then immediately start measuring distance and sending web requests.
- While in the ANY state:
- If avgDistance < 20 and > 0, enter blink state, where the red light will blink for 100ms, then turn off for the rest of the delay in the loop.
- If avgDistance >= 20 and < 40, enter any single-color mode using Red. Red light will turn on for duration of delay in loop.
- If avgDistance >= 40 and < 60, enter any single-color mode using Yellow. Yellow light will turn on for duration of delay in loop.
- If avgDistance >= 60 and < 100, enter any single-color mode using Green. Green light will turn on for duration of delay in loop.
- If avgDistance >= 100, enter any off mode. Light will turn off for duration of delay in loop.
- System Design – The technical function of this system is outlined in the code found in the appendix. The main points of the code is the web request function titled SendCommand().
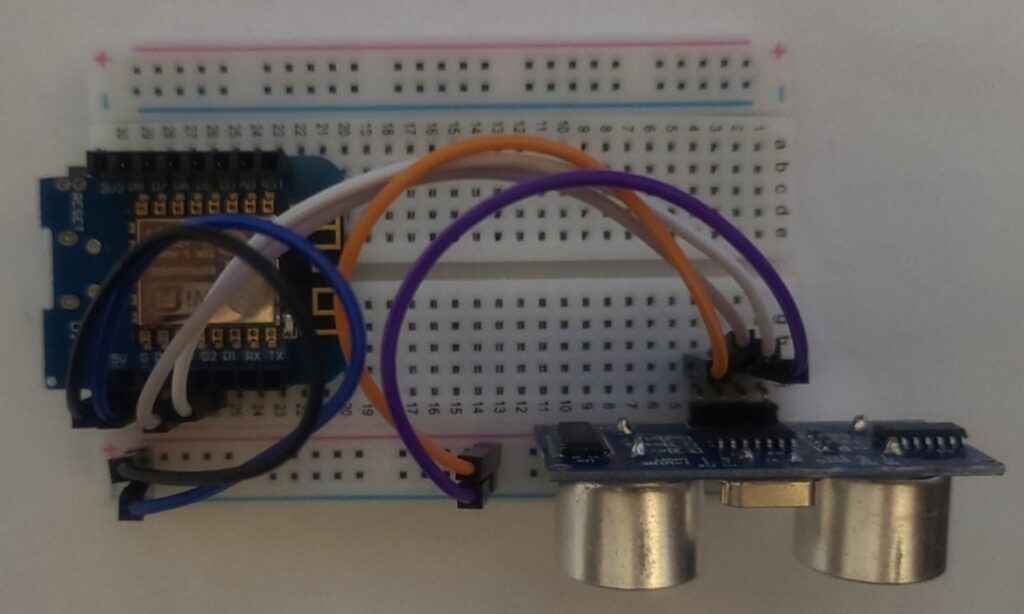
- Component Diagram and Schematic Diagram – This system is represented by the similar “as-built” diagrams below, showing a physical component diagram (in appendix)
- Functionality – This system is a basic state machine, represented by the state diagram in the appendix
- Follow the first two resources under ‘References’ to get a distance output and a basic web request function, then combine the ideas, meeting project specifications.
- Write a function for finding averages and create a way to have a rolling average throughout the loop so that the output isn’t sporadic.
- Test functionality and usability
Observations
This lab was relatively simple compared to the last one mainly because the loop was so easy to craft. The library I used for the ultrasonic distance sensor was as simple as it could get. The web requests were easy to make following an online example as well. Combining the ideas took no time at all! I had challenges with two things: including the right libraries and getting a rolling average.
The libraries I was supposed to use in the ESP8266 boards needed “ESP8266” prepended to the header file names. Wifi.h and HttpClient.h needed to be ESP8266WiFi.h and ESP8266HTTPClient.h for my board. I did not know this when trying online examples, so for a while I was confused. However, I figured out my problem when I found a ESP8266-specific get request example, which I’ve made sure to add to my references section.
While getting a rolling average, I wanted a way to have the number of distances to average be a variable, then have everything else ‘just work’ with whatever variable the user selected. I did this with a #define statement and used an array of floats (for times) set to the numberOfDistancesToAverage size. When iterating through the times array, I used the numberOfDistancesToAverage preprocessor constant as my limit. Although this was unnecessary for meeting project specs, I found that my distance sensor became very reliable using the average distance from the last 5 measurements while not slowing down the system much.
This project focused on the ultrasonic distance sensor, which was connected to the previous project’s Arduino web server stoplight. This sensor simply made GET HTTP requests when reading set distances. The user can define the distances necessary for their use case in the code.
Thought Questions
Think of the interaction between your devices. How well would this scale to multiple devices? Is it easy to add another sensor? Another actuator?
This system could be flexible given its simplicity. Another actuator could be added easily by simply adding a second web request in the sensors code, allowing for another stoplight or maybe a screen displaying the current state of the stoplight based on the last web request. Adding another sensor would also be easy, but I doubt its usefulness in this case without another actuator. Two sensors with one actuator built like the current solution would not doubt interfere with each other.
What are strengths and weaknesses of the tennis-ball-on-a-string system that Don had originally? What are strengths and weaknesses of the IoT system that he developed? What enhancements would you suggest?
The tennis ball is guaranteed to work without electricity and its simplicity is unbeatable. The IOT system is more flexible once in place as the user can change out distances in the code. The IOT system can also be connected to many other services for home automation. Many of the strengths of one of these methods are the weaknesses of the other. I’d suggest having an off-logic switch in the system after a set time at any color, so a parked car won’t keep the red light on all night. I’d also set up a way to have the actuator (stoplight) do more than a stoplight, like strobe red when a home invasion is detected.
What was the biggest challenge you overcame in this lab?
My biggest challenges were the rolling average and the system libraries, which I discussed in the observations section. I also had problems with 2 of my Arduino D1s that I believe are defective.
Please estimate the total time you spent on this lab and report.
I spent about 2 hours on the project with 2 hours on this lab report.
Certification of Work
I certify that the solution presented in this lab represents my own work. In the case where I have borrowed code or ideas from another person, I have provided a link to the author’s work in the references and included a citation in the comments of my code.
–Jairus Christensen
Appendix A: State Functionality Diagram
Appendix B: Physical Component Diagram
Appendix C: Arduino Code
#include <HCSR04.h>
#include <ESP8266WiFi.h>
#include <ESP8266HTTPClient.h>

#define echoPin D2 // attach pin D2 Arduino to pin Echo of HC-SR04
#define trigPin D3 //attach pin D3 Arduino to pin Trig of HC-SR04
#define numberOfDistancesToAverage 5

HCSR04 hc(D3, D2); //initialisation class HCSR04 (trig pin , echo pin)

// wifi pass
const char* ssid = "<SSID NAME>";
const char* password = "<PASSWORD>";

//Your Domain name with URL path or IP address with path
String serverName = "http://<ipOrHostname>/";

bool tooClose = false;
int i = 0;
float times[ numberOfDistancesToAverage ] = {0.0};

void sendCommand(char* color) {
  if (WiFi.status() == WL_CONNECTED) {
    WiFiClient client;
    HTTPClient http;
    String serverPath = serverName + color;
    // Your Domain name with URL path or IP address with path
    http.begin(client, serverPath.c_str());
    // Send HTTP GET request
    int httpResponseCode = http.GET();
    http.end();
  } else {
    Serial.println("WiFi Disconnected");
  }
}

void setup() {
  Serial.begin(115200);

  WiFi.begin(ssid, password);
  Serial.println("Connecting");
  while(WiFi.status() != WL_CONNECTED) {
    delay(500);
    Serial.print(".");
  }
  Serial.println("");
  Serial.print("Connected to WiFi network with IP Address: ");
  Serial.println(WiFi.localIP());
  Serial.println("Timer set to 5 seconds (timerDelay variable), it will take 5 seconds before publishing the first reading.");
}

void loop() {
  tooClose = false;
  float distance = hc.dist();
  times[i] = distance;
  float avgDistance = findAverage(times);
  Serial.print("i: ");
  Serial.print(i);
  Serial.print(" -- Distance: ");
  Serial.print(distance);
  Serial.print("cm -- avgDistance: ");
  Serial.print(avgDistance);
  Serial.print("cm -- stoplight will ");
  if ( avgDistance < 20 && avgDistance > 0) {
    tooClose = true;
    Serial.print("blink");
  }
  else if ( avgDistance >= 20 && avgDistance < 40) {
    sendCommand("red");
    Serial.print("be red");
  }
  else if ( avgDistance >= 40 && avgDistance < 60) {
    sendCommand("yellow");
    Serial.print("be yellow");
  }
  else if ( avgDistance >= 60 && avgDistance < 100) {
    sendCommand("green");
    Serial.print("be green");
  }
  else if ( avgDistance >= 100) {
    sendCommand("off");
    Serial.print("be off");
  }
  else {
    Serial.print("Error: AvgDistance was ");
    Serial.print(avgDistance);
    Serial.print(".");
  }
  Serial.print("\n");
  if(tooClose) {
    sendCommand("off");
    delay(100);
    sendCommand("red");
  }
  delay(100);
  i = (i + 1) % (numberOfDistancesToAverage);
}

float findAverage(float* times) {
  float total = 0.0;
  for(int j = 0; j < (numberOfDistancesToAverage); j++) {
    total += times[j];
  }
  return total / numberOfDistancesToAverage;
}
Appendix D: Serial Monitor Output
i: 1 -- Distance: 106.83cm -- avgDistance: 54.91cm -- stoplight will be yellow
i: 2 -- Distance: 183.75cm -- avgDistance: 84.03cm -- stoplight will be green
i: 3 -- Distance: 114.67cm -- avgDistance: 114.34cm -- stoplight will be off
i: 4 -- Distance: 114.92cm -- avgDistance: 114.60cm -- stoplight will be off
i: 0 -- Distance: 115.36cm -- avgDistance: 114.78cm -- stoplight will be off
i: 1 -- Distance: 115.46cm -- avgDistance: 114.97cm -- stoplight will be off
i: 2 -- Distance: 115.11cm -- avgDistance: 115.10cm -- stoplight will be off
i: 3 -- Distance: 131.22cm -- avgDistance: 118.42cm -- stoplight will be off
i: 4 -- Distance: 121.43cm -- avgDistance: 119.72cm -- stoplight will be off
i: 0 -- Distance: 43.55cm -- avgDistance: 105.36cm -- stoplight will be off
i: 1 -- Distance: 20.91cm -- avgDistance: 86.45cm -- stoplight will be green
i: 2 -- Distance: 13.02cm -- avgDistance: 66.03cm -- stoplight will be green
i: 3 -- Distance: 16.46cm -- avgDistance: 43.07cm -- stoplight will be yellow
i: 4 -- Distance: 42.77cm -- avgDistance: 27.34cm -- stoplight will be red
i: 0 -- Distance: 45.36cm -- avgDistance: 27.70cm -- stoplight will be red
i: 1 -- Distance: 45.75cm -- avgDistance: 32.67cm -- stoplight will be red
i: 2 -- Distance: 50.03cm -- avgDistance: 40.07cm -- stoplight will be yellow