Objective
The purposes of this lab are to:
- Learn to enumerate requirements from use cases and user stories
- Learn to utilize the general-purpose input/output (GPIO) pins on the Raspberry Pi to control LEDs.
- Learn to develop a minimum viable product and deliver new functionality through subsequent updates until the requirements are met, and all the deliverables are acceptable.
Materials
I used the following materials to accomplish this lab:
- Raspberry Pi
- 1 x Breadboard
- 1 x Red LED
- 1 x Yellow LED
- 1 x Green LED
- 3 x 33 Ω Resistor (OrOrBlGd)
- 4x Jumper Wires
References
I used the following resources in this lab:
- https://github.com/WiringPi/WiringPi – This is the open-source Wiring Pi code that you can compile yourself to get the wiringpi package. Follow the instructions in the readme to install.
- https://randomnerdtutorials.com/raspberry-pi-web-server-using-flask-to-control-gpios/ – This site provides a great tutorial on how to build a webserver that can control Raspberry Pi GPIOS.
- https://online.visual-paradigm.com – This is the program I used to create the state diagram below.
- https://1drv.ms/w/s!Ais81h0TsK5NhqEUuevEs8zMavzLag?e=hdaL2m – Todd Berrett’s example write-up
Procedures:
- Install the GPIO libraries if necessary (like wiringpi) for your raspberry pi. For wiringpi, you’ll need to follow the instructions in the readme.
- Enable GPIO output in raspi-config.
- Model the functionality, logical flow, and components of the system. Include a schematic diagram.
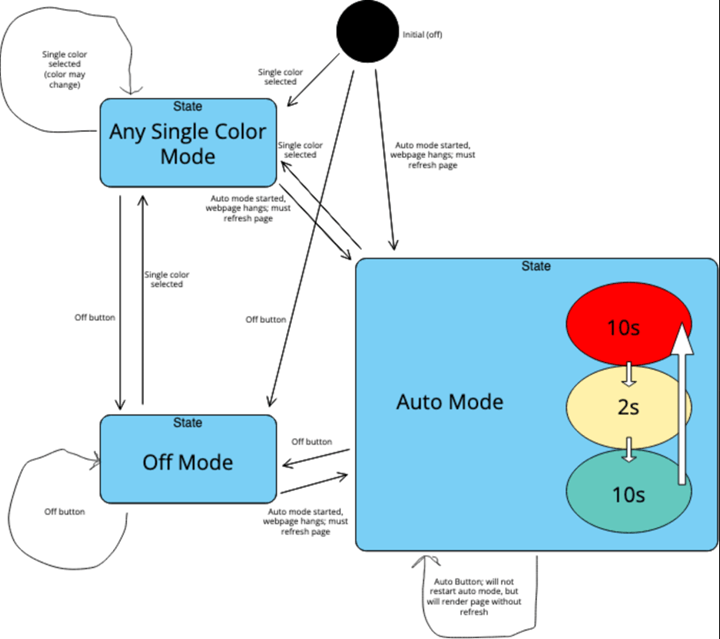
- Functionality – This system is a basic state machine, represented by the following diagram in Appendix 1:
- While in the “Initial (off)” state:
- While in the “Any Single Color” state.
- If the system receives a /<gpio number> command, it will change to the ‘Any Single Color’ state where the LED associated with that color will be lit. This color may be different from the previous color.
- If the system receives an /off command, it will change to the “Off” state, which is depicted above as being different from the initial off state.
- If the system receives an /auto command, it will change to the “Auto” state where red, yellow, and green will be cycled in 10-2-10 intervals. This will cause the webpage to hang until the Refresh button is pressed.
- While in the “Off” state:
- If the system receives a /<gpio number> command, it will change to the ‘Any Single Color’ state where the LED associated with that color will be lit.
- If the system receives an /off command, it will remain in the “Off” state, which is depicted above as being different from the initial off state.
- If the system receives an /auto command, it will change to the “Auto” state where red, yellow, and green will be cycled in 10-2-10 intervals. This will cause the webpage to hang until the Refresh button is pressed.
- While in the “Auto” state:
- If the system receives a /<gpio number> command, it will change to the ‘Any Single Color’ state where the LED associated with that color will be lit.
- If the system receives an /off command, it will change to the “Off” state, which is depicted above as being different from the initial off state.
- If the system receives an /auto command, it will remain in the “Auto” state where red, yellow, and green will be cycled in 10-2-10 intervals. This does not reset the Auto cycle, but simply loads the webpage.
- System Design – The technical function of this system is outlined in the code found in the appendix. The main points of the code are the web handler functions. Do notice that red, yellow, and green are variables at the top of the code so that the GPIO pin numbers and color strings are interchangeable.
- Component Diagram and Schematic Diagram – This system is represented by the similar “as-built” diagrams in Appendix 2, showing a physical component diagram.
- Functionality – This system is a basic state machine, represented by the following diagram in Appendix 1:
- Program the code in RPi’s builtin Thonny Python IDE. Follow this tutorial found in the references section.
- Edit the code given in the tutorial to match project specifications.
Observations
This lab was fun and straightforward for me. I’ve written web applications before, so I was used to the HTML, CSS, and URL handling concepts. What hadn’t done was a lot with python. I was really surprised by how easily the Raspberry Pi can handle GPIOs. With just a couple lines of code, an LED was ready to go! I loved how easy that was.
One of the hardest parts of the lab for me, was that I had the urge to do it with a multi-threaded approach. I learned that python’s flask server is multi-threaded already, and that I shouldn’t write extra threads. The easiest way to do the lab turned out to be the best way: to have a global variable that signifies if auto mode is on or off. This variable took away the need for spawning a thread, and I felt silly for over complicating what should’ve been simple.
If I were to do it over again, I’d find a way to not have the /auto page hang the first time its run. This is still a problem in my code since I couldn’t respond with a webpage until the Auto loop ended. This meant that the first /auto query would cause the browser to spin forever, but subsequent queries while the Auto loop is running can return the webpage immediately. I believe this is a limitation for flask since it seems to lack the capability of user defined multi-threading to run GPIOs. I couldn’t get it to run the Auto loop in the background successfully.
Because there is only a single device, there isn’t any communication between internal components. The single device does the following:
- Listening on TCP port 80
- Parsing input
- Controlling the GPIO pins (and therefore, the LEDs)
- Responding to the client with HTML
Thought Questions
What language did you choose for implementing this project? Why?
I wrote this project in Python using flask as my web server. I did this because it seemed the easiest considering the wonderful tutorial I found online. It ended up being a great choice; I got the example given in the tutorial running in a matter of minutes and the entirety of this lab was just to edit the code I then had working already.
What is the purpose of the resistor in this simple circuit? What would happen if you omitted it?
The purpose of the resistor in this simple circuit is to ensure that the wire has absolutely no voltage left before returning to ground so that the raspberry pi’s GPIO pin and underlying circuit are not damaged. The LEDs will draw more current that can be given by the raspberry pi, so without a resistor, the LED will pull more current out of the pi, causing it to burn up. This is all regulated with a single resistor.
What are practical applications of this device? What enhancements or modifications would you make?
This could be used as an actual traffic stoplight, as well as an indicator for a variety of things since its controllable from anywhere. It could be hung in front of an office door to indicate if the occupant is in a meeting, able to talk, etc. To make it a stoplight, it would need to have an API of sorts and a method to connect to other stoplights and a single traffic control center. It’d be silly for every traffic light to have its own web interface instead of probing an API for instruction. Also, the webpage would need authentication of some sort so that the traffic lights couldn’t be hacked.
Please estimate the total time you spent on this lab and report.
I spent about 5 hours on the project with 2 hours on this lab report.
Certification of Work
I certify that the solution presented in this lab represents my own work. In the case where I have borrowed code or ideas from another person, I have provided a link to the author’s work in the references and included a citation in the comments of my code.
–Jairus Christensen
Appendix 1: State/Functionality Diagram
Appendix 2: Physical Component Diagram

Appendix 3: Python Flask App Code (app.py)
import RPi.GPIO as GPIO
import time
import requests
import threading
from flask import Flask, render_template, request, abort
app = Flask(__name__)
button = 27
green = 17
yellow = 22
red = 23
InAutoMode = False
GPIO.setmode(GPIO.BCM)

pins = {
   17 : {'name' : 'Green', 'state' : GPIO.LOW},
   22 : {'name' : 'Yellow', 'state' : GPIO.LOW},
   23 : {'name' : 'Red', 'state' : GPIO.LOW}
   }

for pin in pins:
   GPIO.setup(pin, GPIO.OUT)
   GPIO.output(pin, GPIO.LOW)

@app.route("/")
def main():
   for pin in pins:
      pins[pin]['state'] = GPIO.input(pin)

   return renderPage()

@app.route("/favicon.ico")
def page_not_found():
    abort(404)

@app.route("/<changePin>")
def action(changePin, calledFromAuto=False):
   global InAutoMode
   if (calledFromAuto == False and InAutoMode == True):
      InAutoMode = False
      print('Auto Disabled')
   turnOffAllPins()
   changePin = int(changePin)
   deviceName = pins[changePin]['name']
   GPIO.output(changePin, GPIO.HIGH)
   print("Light is currently: " + deviceName)
   for pin in pins:
      pins[pin]['state'] = GPIO.input(pin)

   return renderPage()

@app.route('/off')
def off():
    global InAutoMode
    InAutoMode = False
    turnOffAllPins()
    print('Light Off')
    return renderPage()

@app.route('/auto')
def auto():
    global InAutoMode
    if (InAutoMode == False):
        InAutoMode = True
        print('Auto Enabled')
        while (InAutoMode == True):
            if (InAutoMode == True):
                turnOffAllPins()
            else:
                break
            if (InAutoMode == True):
                action(red, True)
            else:
                break
            time.sleep(10)
            if (InAutoMode == True):
                action(green, True)
            else:
                break
            time.sleep(10)
            if (InAutoMode == True):
                action(yellow, True)
            else:
                break
            time.sleep(2)

    return renderPage()

def turnOffAllPins():
    for pin in pins:
      GPIO.output(pin, GPIO.LOW)

    return

def renderPage():
    templateData = {
       'pins' : pins
    }

    return render_template('main.html', **templateData)

if __name__ == "__main__":
   app.run(host='0.0.0.0', port=80, debug=True)
Appendix 4: Web Page Code (main.html)
<!DOCTYPE html>
<head>
<title>RPi Web Server</title>
<!--<meta http-equiv="refresh" content="2">-->
<!-- Latest compiled and minified CSS -->
<link rel="stylesheet" href="https://maxcdn.bootstrapcdn.com/bootstrap/3.3.6/css/bootstrap.min.css" integrity="sha384-1q8mTJOASx8j1Au+a5WDVnPi2lkFfwwEAa8hDDdjZlpLegxhjVME1fgjWPGmkzs7" crossorigin="anonymous">
<!-- Optional theme -->
<link rel="stylesheet" href="https://maxcdn.bootstrapcdn.com/bootstrap/3.3.6/css/bootstrap-theme.min.css" integrity="sha384-fLW2N01lMqjakBkx3l/M9EahuwpSfeNvV63J5ezn3uZzapT0u7EYsXMjQV+0En5r" crossorigin="anonymous">
<!-- Latest compiled and minified JavaScript -->
<script src="https://maxcdn.bootstrapcdn.com/bootstrap/3.3.6/js/bootstrap.min.js" integrity="sha384-0mSbJDEHialfmuBBQP6A4Qrprq5OVfW37PRR3j5ELqxss1yVqOtnepnHVP9aJ7xS" crossorigin="anonymous"></script>
<style>
title {text-align: center;}
</style>
</head>
<body>
<h1>Traffic Control</h1>
{% for pin in pins %}
{% if pins[pin].state == true %}
<h3> Light is currently <strong>{{ pins[pin].name }}</strong> <a href='https://traffic.christensencloud.us' class='btn btn-lg btn-default'>Refresh</a></h3>
{% endif %}
{% endfor %}
{% for pin in pins %}
{% if pins[pin].state == true %}
<a href="/{{pin}}" class="btn btn-block btn-lg btn-default" role="button">Turn {{ pins[pin].name }}</a></div></div>
{% else %}
<a href="/{{pin}}" class="btn btn-block btn-lg btn-default" role="button">Turn {{ pins[pin].name }}</a></div></div>
{% endif %}
{% endfor %}
<a href="/auto" class="btn btn-block btn-lg btn-default" role="button">Auto</a></div></div>
<a href="/off" class="btn btn-block btn-lg btn-default" role="button">Off</a></div></div>
<style>
h1 {text-align: center;}
h2 {text-align: center;}
h3 {text-align: center;}
div {text-align: center;}
</style>
</body>
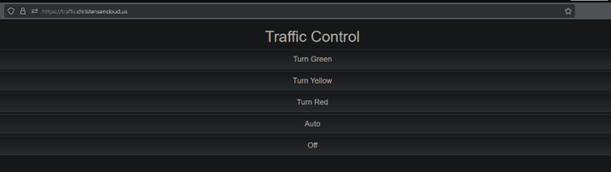
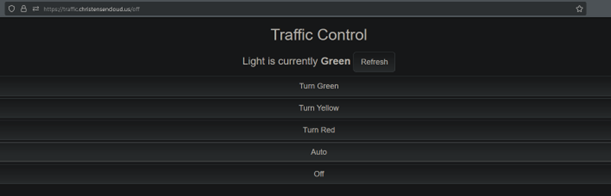
</html>Appendix 5: System Interface – Web Page
State: startup
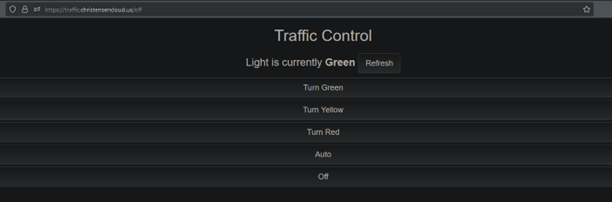
State: /<gpio number>
State: /off (refresh not reflect that light is off – for now)
State: /auto (refresh will show new color)
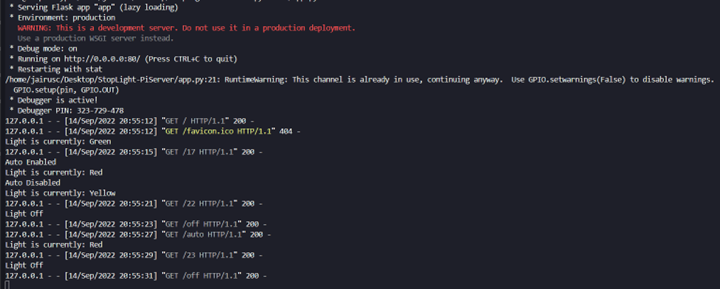
Appendix 6: Serial Monitor Output