Lets say your Proxmox Host performs an update and the update fails. Or maybe some settings got changed and aren’t able to be changed back. Or something breaks. With a normal Proxmox install, you can’t just start over. Reinstalling Proxmox will wipe the entire disk and rebuild the partition table. Even if you tell the Proxmox installer to only use 20GB, everything on that disk will be gone.
Those of us that have our Virtual Machines and Containers on the same hard disk or RAID disk need a way to reinstall Proxmox safely without losing our data. On top of that, we need a way to back up the Proxmox host so that if an update fails or a setting changes we are able to revert!
The purpose of installing Proxmox in the following method will allow you to
- Backup and restore the host at any time
- Reinstall Proxmox without destroying data
- Install other GUI applications on your host
Will need:
- Bootable USB with Debian Bullseye DVD installer (not the network installer)
- You may not need this, but USB with this firmware and this firmware on it. They can just be .deb files on a FAT formatted drive. This was needed for my PowerEdge R815 Server.
Installation
- Boot onto the bootable USB and start the install process.
- NOTE: If confronted with “missing bnx2/bnx2 firmware” on PowerEdge R815, verify that extra USB is plugged in and select “Yes” to searching for the firmware on the extra drive.
- Remember that the hostname you set will become the name of your pve node.
- You will need to be connected to internet via Ethernet. Wifi probably won’t be enough, and you can tell when something isn’t working when its not able to autodetect network settings.
- Make sure you use a network mirror to download the extra packages you’ll need. The default one is fine.
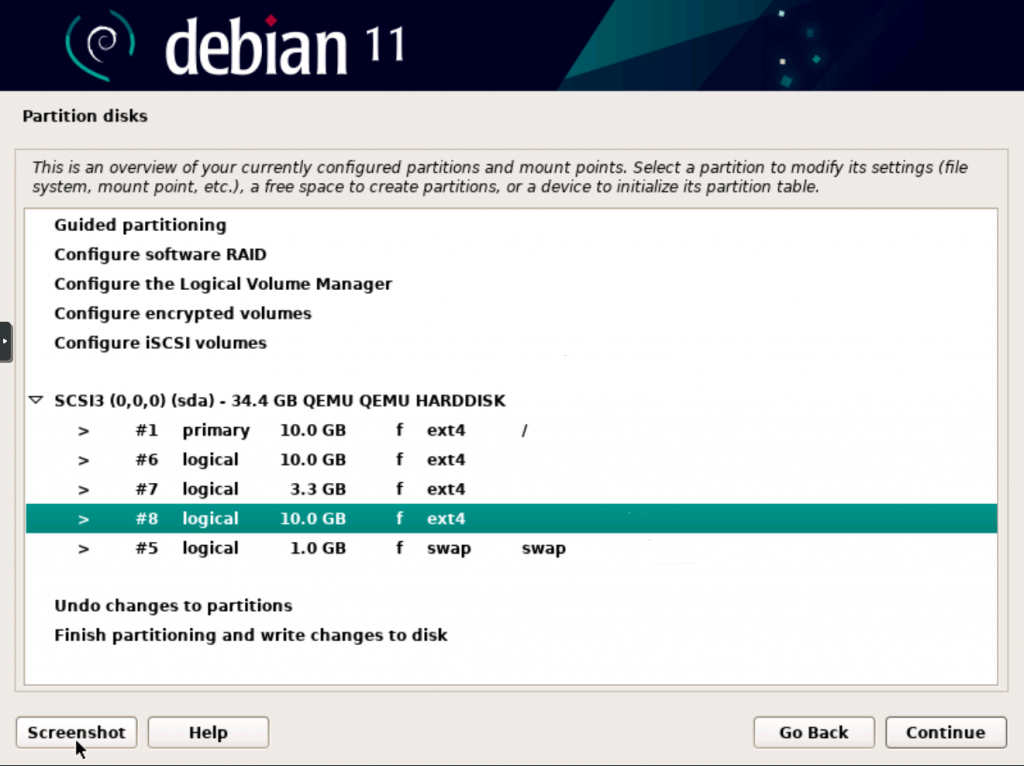
- If using Legacy BIOS, Install with 1 Primary partition (root partition), the rest are logical partitions
- If using UEFI, let the installer lay out your partitions automatically, then delete the largest one it makes (you do this so you can keep the EFI partition it creates!)
- In either of these scenarios, make these partitions
- / mounted ext4 partition for Debian Bullseye
- (non mounted) partition for TimeShift that’s 150% the size of the root partition.
- (non mounted) partition for VM data
- (non mounted) partition for Directory (roughly 30% of the space that VM data will occupy)
- swap partition
- MINE LOOKED SOMETHING LIKE THIS:
- 20GB Root Ext4
- 30GB TimeShift Ext4
- ~1.5TB Directory Storage for ISOs, Backups, Snapshots, etc.
- ~3.91TB LVM-Thin VM Storage
- 1GB Swap
- Example for Legacy BIOS set up:
- Say YES to using a Network Mirror
- Special options for optional programs at the end:
- Debian Desktop
- MATE (not Gnome!)
- SSH SERVER
- Install the bootloader on the disk that has your root partition
FROM HERE ON OUT, DO EVERY COMMAND AS ROOT. Run su root to be root.
Verify that everything is installed and works before installing Proxmox.
Take MANY snapshots with TimeShift during installation as soon as TimeShift is installed. It will save your bacon
Give Static IP
This can be skipped if you set the IP manually in your Desktop Environment but make sure to turn the interface off and on again after doing so.
- Once booted, hit
ctrl+alt+F2to get a shell on the machine su rootto become root- Find your IP information with
ip aand enter that information into/etc/network/interfaces - Should look similar to this:
# This file describes the network interfaces available on your system
# and how to activate them. For more information, see interfaces(5).

source /etc/network/interfaces.d/*

# The loopback network interface
auto lo
iface lo inet loopback

# Added by Jairus
# The primary network interface
allow-hotplug eno1
# `auto eno1` used to work..?
iface eno1  inet static
 address 10.0.0.3
 netmask 255.255.255.0
 gateway 10.0.0.1
 dns-domain box
dns-nameservers 10.0.0.10- If something breaks, use this guide
- restart ‘networking’ service with
systemctl restart networkingand ensure that no errors occur. - From here on out you can SSH in.
Setting Configuration
- Go back to the GUI with `systemctl restart lightdm` and login
- Go to the system > Preferences > Hardware > Power Management and set “Put computer to sleep when inactive for:” to “Never”. Without this, your node will turn off after inactivity on the GUI.
- On the General tab, set Power and Suspend buttons to do Nothing
- Open a terminal shell and
su rootto become root nano /etc/apt/sources.listand comment out the CD installer- Should look similar to this…
# deb cdrom:[Debian GNU/Linux 11.2.0 _Bullseye_ - Official amd64 DVD Binary-1 20211218-11:13]/ bullseye contrib main

# deb cdrom:[Debian GNU/Linux 11.2.0 _Bullseye_ - Official amd64 DVD Binary-1 20211218-11:13]/ bullseye contrib main

deb https://deb.debian.org/debian/ bullseye main non-free contrib
deb-src https://deb.debian.org/debian/ bullseye main non-free contrib

deb https://security.debian.org/debian-security bullseye-security main contrib non-free
deb-src https://security.debian.org/debian-security bullseye-security main contrib non-free

# bullseye-updates, to get updates before a point release is made;
# see https://www.debian.org/doc/manuals/debian-reference/ch02.en.html#_updates_and_backports
deb https://deb.debian.org/debian/ bullseye-updates main contrib non-free
deb-src https://deb.debian.org/debian/ bullseye-updates main contrib non-free- As root, run
apt update && apt install firmware-linux firmware-iwlwificurl gparted timeshift tigervnc-standalone-server xrdp -y && apt upgrade -yto upgrade your computer and get the software and firmware it needs- NOTE: firmware-linux may not work, and if it doesn’t maybe it’s not needed!
- As root,
nano /etc/environmentand add the lineexport PATH=/usr/local/bin:/usr/bin:/bin:/usr/local/games:/usr/games:/usr/sbinto make sure some commands work. - Log out of session and log back in, then in a shell run
echo $PATHto make sure/usr/sbin/is part of the output of the command.
Install A Way to Remote Desktop when Needed
You can skip this step with Gnome and just turn on the VNC screen sharing in Settings > Sharing > Screen Sharing
- Run the following commands as ROOT
echo "<your non-root username>  ALL=(ALL) NOPASSWD:ALL" | sudo tee /etc/sudoers.d/<your non-root username>
systemctl enable --now xrdp
adduser xrdp ssl-cert
systemctl restart xrdp
- Now connect via Windows Remote Desktop. Once connected, choose
Xvncand login as root- If
"Could not get session name on session bus"error shows up, update the computer, reboot and try again. Keep in mind that xrdp may be broken in the latest Debian release. - This can be fixed following this guide then rebooting (and not logging in locally after reboot before trying to connect)
- If
- To conserve your CPU power while not serving VNC remote desktop, run
sudo systemctl disable lightdm,sudo systemctl stop lightm
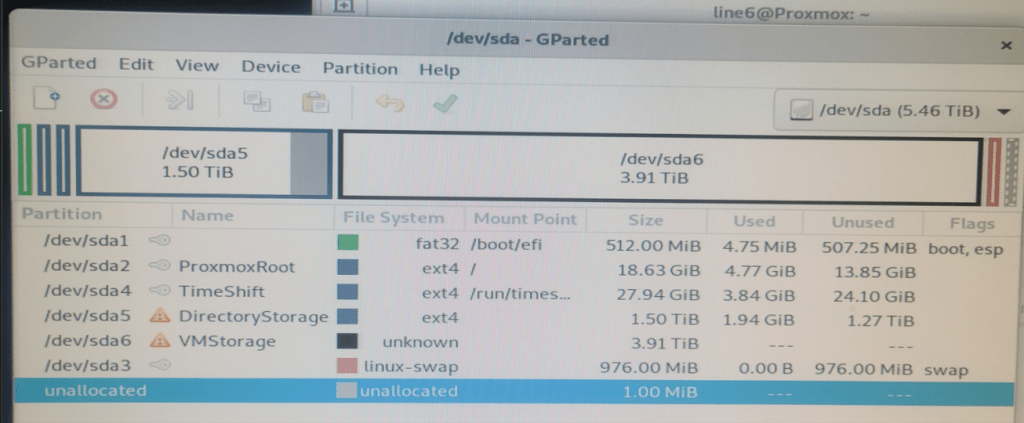
Partition Drives
- Open Gparted in the GUI
- Make the partitions used for Proxmox (Directory and VM Storage) either “Cleared” or “Unformatted”.
- Reformat the TimeShift one to be ext4 if it’s not already. Name all the important partitions so you never forget what they are.
Install TimeShift to make backups
- Open TimeShift in the GUI
- Configure it to use the 30GB TimeShift partition you created earlier
- Take your first snapshot
- Make sure to set up Weekly, Monthly, and Hourly backups of the system
Optional: Add Zerotier
- Add Zerotier to the server so you can reach it even if your VPN server is down
curl -s https://install.zerotier.com | sudo bashzerotier-cli join <your_network_id>- Now go approve the device and assign it an ip address in Zerotier Central
systemctl restart zerotier-one
Verify that everything works before moving on!
Install Proxmox
- Open Terminal and
su rootto become root hostnamectl set-hostname <your hostname with domain ending> --static(domain ending can be.byu.eduor your own custom domain, like.boxor.local)nano /etc/hostsand change the line under 127.0.0.1 to be your static ip. Also add any other DNS aliases you’d like. It should look something like…
# /etc/hosts
127.0.0.1       localhost
10.0.0.8        Proxmox Proxmox.local debian.local debian

# The following lines are desirable for IPv6 capable hosts
::1     localhost ip6-localhost ip6-loopback
ff02::1 ip6-allnodes
ff02::2 ip6-allrouters- Now run these commands to add the right repository and keys to apt.
echo "deb [arch=amd64] http://download.proxmox.com/debian/pve bullseye pve-no-subscription" > /etc/apt/sources.list.d/pve-install-repo.list

wget https://enterprise.proxmox.com/debian/proxmox-release-bullseye.gpg -O /etc/apt/trusted.gpg.d/proxmox-release-bullseye.gpg

apt update && apt full-upgrade -y
reboot- Take another backup on TimeShift via the GUI now.
- Then continue with these commands to remove unnecessary packages and finally install Proxmox
# only run this if you're not dual booting...
apt remove os-prober -y

# This command will actually install Proxmox
# You can set the postfix configuration to "No Configuration" when it pops up. We'll set that up later
apt install proxmox-ve postfix open-iscsi -y
reboot

# then ssh back in after reboot and remove Debian kernel, leaving only the Proxmox one
apt remove linux-image-amd64 'linux-image-5.10*'
# Update and check grub with
update-grub
Configure Proxmox
Map Drives
- Now that Proxmox is installed, go to the web GUI on a separate computer using https://<ip_address>:8006, go to your pve name -> Disks -> LVM-Thin
- Create a Thinpool disk out of your largest partition. This will serve as the partition where ALL VM DATA IS KEPT, in case Proxmox or the Debian host gets screwed up.
- Go up a tab to Directory. Create a XFS Directory Disk out of your second largest partition. This will store all of your ISOs, backups, snapshots, etc.
Create Network Interface
- Create a Virtual Network Interface (pve name -> System -> Network -> Create -> Linux Bridge). Now “cut” the IPv4 and gateway data from your existing Network Device and save it, then paste that data it to your new virtual interface and save it. Add the name of the Network Device that you just stole the IPv4 info from as the Bridge Port.
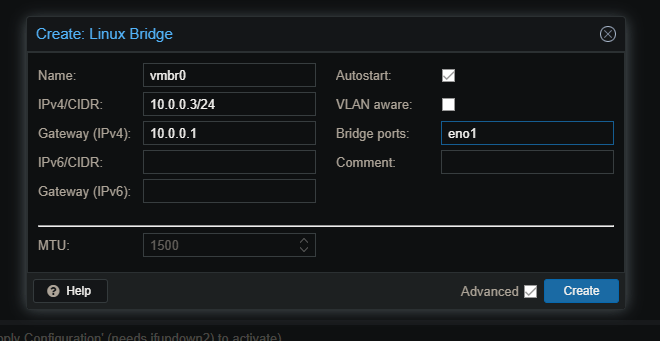
Notice how the eno1 interface in this example doesn’t have any ip information.
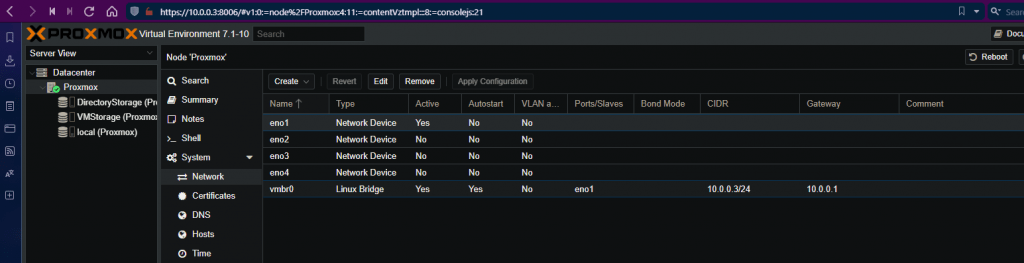
- Click “Apply Configuration.
- On the left-and column, add DNS servers though –> System –> DNS. You can add your own DNS servers here, then add 8.8.8.8 and/or 8.8.4.4 (Google’s DNS servers) if you still have room.
Configure Repositories
- Disable enterprise repo through
<PVE_instance_name> --> Updates --> Repositories. Click on Thepve-enterpriseone and then hit “Disable”
Setup Automatic Backups
- To to
<DataCenter> --> Backup --> addand create atleast a weekly backup of all your VMs
Backup/Restore Proxmox Host
- If you need to backup the Promox data (including VM data) you’ll backup
/etc/pve/*for the proxmox config stuff and/var/lib/vz/dump/*for the backups/snapshots of your VMs. - Restore those folders after install.
Restore Proxmox VMs
- Here’s the documentation (look at the bottom examples!) (see the end for examples)
- Here’s a how-to for VMs
- If you can’t find the command
pct, find the path usingwhereis pct. Same withqmrestore - With
qmrestoreandpctyou may want to specify which storage you want it on with--storage <storage name>
# Example restore a VM
qmrestore --storage VMStorage ./vzdump-qemu-100-2022_02_08-13_11_40.vma.zst 100

# Example restore a container
pct restore --storage VMStorage 110 vzdump-lxc-105-2022_02_08-13_11_09.tar.zst
Set up Email Relay
apt install --reinstall postfix mailutils
cp /usr/share/postfix/main.cf.debian /etc/postfix/main.cf- Edit
/etc/postfix/main.cf. You will comment out the oldmydestinationandrelayhostand then add these lines to the bottom to read something like this…
...
smtpd_relay_restrictions = permit_mynetworks permit_sasl_authenticated defer_unauth_destination
myhostname = Proxmox.box
alias_maps = hash:/etc/aliases
alias_database = hash:/etc/aliases
# myorigin = /etc/mailname
# mydestination =
# relayhost =
mynetworks = 127.0.0.0/8 [::ffff:127.0.0.0]/104 [::1]/128
mailbox_size_limit = 0
recipient_delimiter = +
inet_interfaces = all
inet_protocols = ipv4

# Added by jairus
relayhost = [smtp.gmail.com]:587
smtp_use_tls = yes
smtp_sasl_auth_enable = yes
smtp_sasl_security_options = noanonymous
smtp_sasl_password_maps = hash:/etc/postfix/sasl_passwd
smtp_tls_CAfile = /etc/ssl/certs/ca-certificates.crt- Create google account (or use existing one) and create third party passcode for mail.
- Then edit
/etc/postfix/sasl_passwdto read something like this
[smtp.gmail.com]:587 <google account email address>:<third party password here>- Then run…
chmod 600 /etc/postfix/sasl_passwd

postmap /etc/postfix/sasl_passwd

systemctl restart postfix.service- Then test if this setup works by sending another one of your email addresses a test email with…
echo "Test mail from Proxmox" | mail -s "Test Proxmox" <your email address here>Ways to Stop and Start Proxmox
This is important when using apt. Without Proxmox being stopped, apt will throw and error about not being able to --configure pve-manager
- Create stop script in
/root/stopProxmox.sh
echo Stopping Proxmox
killall -9 corosync >/dev/null 2>&1
systemctl stop pve-cluster
systemctl stop pvedaemon
systemctl stop pveproxy
systemctl stop pvestatd
echo Success!- Create start script in
/root/startProxmox.sh
echo Starting Proxmox
killall -9 corosync >/dev/null 2>&1
systemctl start pve-cluster
systemctl start pvedaemon
systemctl start pveproxy
systemctl start pvestatd
echo Success!- Make both scripts executable by running
chmod +x /root/startProxmox.sh /root/stopProxmox.shFinally
- Backup TimeShift again once everything works and name this backup something obvious so you can easily restore to this snapshot if anything gets broken.
Conclusion
You should now have a more resilient Proxmox install that backs itself up and can be reinstalled at any time without destroying the VM data in the other partitions.
Please leave a comment with any missed information or any issues you run into while following these instructions. I will surely update this article with more screenshots when asked. Good luck!