Objective
The purposes of this lab are to:
- Build a controller to interface with the existing garage door opener.
- Integrate the garage system with at least one external service (in this case IFTTT) to introduce some additional functionality.
- Utilize a non-web interface for the garage door opener.
Materials
I used the following materials to accomplish this lab:
- Externally reachable Home Assistant OS or Core installed on a separate machine. Can be a VM.
- Note: Making Home Assistant externally reachable is outside the scope of this lab but can be easily accomplished with tools such as port forwarding and DuckDNS. A more secure approach would be to use a Cloudflare tunnel to route Home Assistant to a domain that you own, use Cloudflare ZeroTrust Access rules to secure the endpoint and then use access tokens as headers in IFTTT’s webhook to get through the security provided by the Access Rule. The latter was my approach, and it works well.
- ESP8266 D1 Mini Arduino
- Tongling 5VDC Relay. Will need one that fits atop the D1 Mini to not need extra wiring.
- Mini-USB cord to connect D1 mini to PC.
References
I used the following resources in this lab:
- https://esphome.io/guides/getting_started_hassio.html – Getting started with ESPHome and Home Assistant. Great tutorial for the basics.
- https://esphome.io/cookbook/relay.html – Easy-to-understand explanation on how to add a relay to an Arduino in ESPHome.
- https://www.home-assistant.io/integrations/ifttt – Home Assistant’s own documentation on how to control entities from Home Assistant from a webhook in IFTTT. Read this carefully and your automation in Home Assistant will be very flexible for future IFTTT applets.
- https://1drv.ms/w/s!Ais81h0TsK5NhqEUuevEs8zMavzLag?e=hdaL2m – Todd Berrett’s example write-up
Procedures:
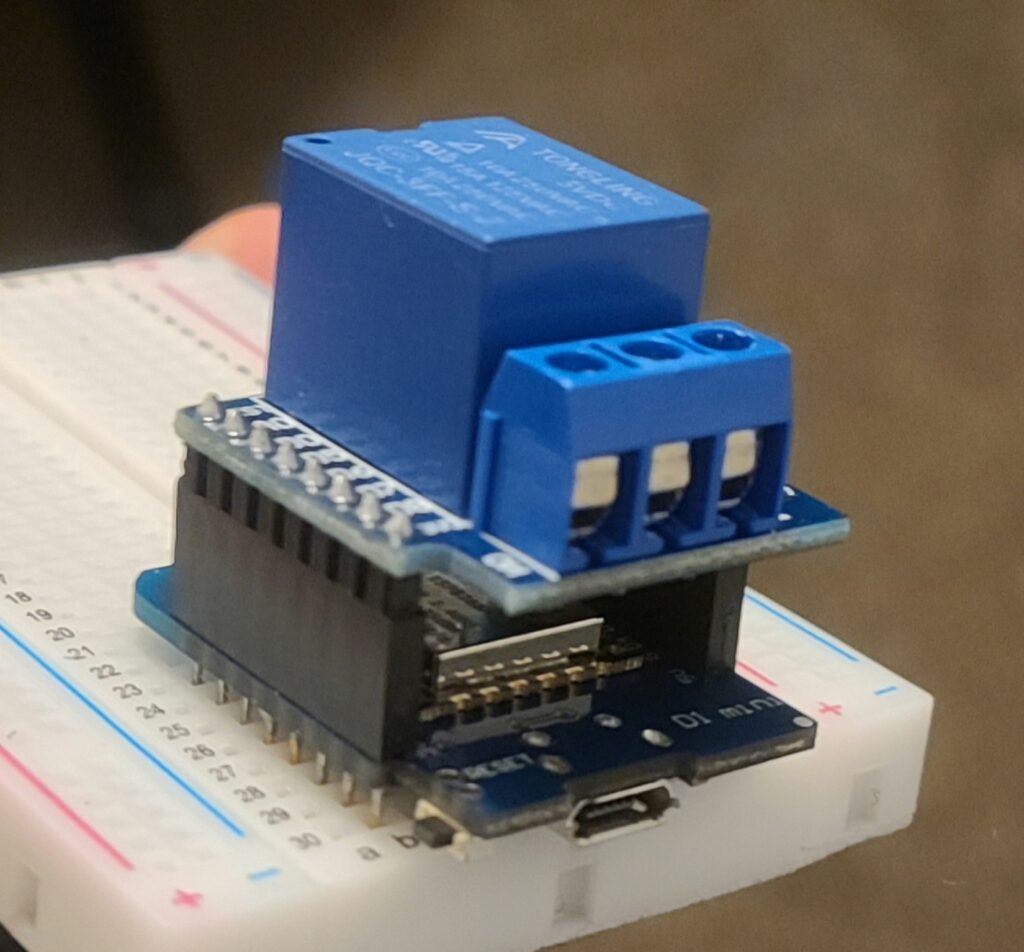
- Place the relay atop the D1 mini and slide the pins into place as seen in appendix E.
- Attach the D1 mini to your PC with the Mini-USB cable.
- In an existing Home Assistant instance, install the ESPHome integration under Settings > Devices and Services > Add Integration > Search for ESPHome. This will give you a new icon on the left-hand side of Home Assistant. This tab lets you control your ESP Arduinos.
- On the ESPHome tab in Home Assistant, create a configuration file for the relay Arduino, including a name for it, the Wi-Fi information, etc.
- Install via the legacy format and download the .bin configuration file.
- Download the ESPHome Flasher, found here, and flash your Arduino with the .bin file downloaded in the last step. Upon booting after, the Arduino should read in the ESPHome tab as being connected. You can also view the log files wirelessly or wired (if the Arduino didn’t connect to Wi-Fi correctly) to debug.
- Include the YAML from the second resource listed to enable the relay in the new Arduino’s configuration file in ESPHome. Use pin D1 for the pin number if the relay is placed atop the D1 mini. Install the new configuration wirelessly now that the Arduino is connected wirelessly to ESPHome. Verify that this new relay can be controlled by Home Assistant by making an entity switch for it in the dashboard and toggling it on and off. The relay should make a click when changing power states as well as display a red light when on.
- Navigate to IFTTT.com and make an account (or login)
- Download the IFTTT app on your smartphone and login with the same credentials. Give the app the necessary location permissions when asked.
- On the website (preferably on your PC), create an IFTTT applet to model when your phone arrives at the garage. For the IF, or the ‘trigger’, search for “location”, and set the location to your garage. For the THEN, or the ‘action’, search for “webhook”. The information to save here will be provided in the following steps.
- In Home Assistant, search for a new integration called “IFTTT”. This will provide some necessary information for your IFTTT webhook action.
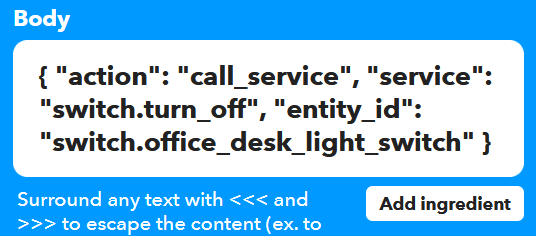
- Use the third resource in the resources section to complete the IFTTT request body. Remember to keep braces and commas in the request body. You’ll also need to find the entity service and entity for the relay in Home Assistant so that you can include it in your request body. It may look something request body in appendix B, but with the entity_id of your relay.
- Save the ‘action’ in IFTTT.
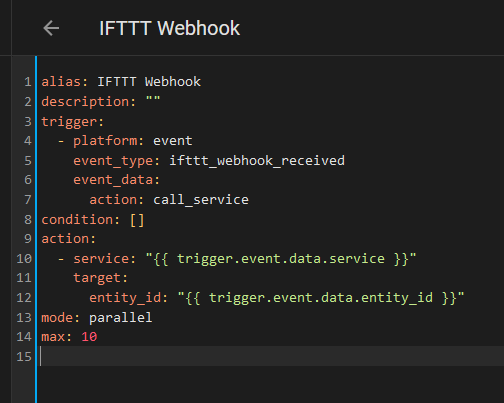
- Navigate to Home Assistant and make an automation (using ‘Edit YAML’ instead of the GUI) that looks like appendix C. Save this and name it something like “IFTTT Webhook”.
- At this point, if everything has been done correctly, arriving at your garage’s location should trigger the IFTTT automation, reach the Home Assistant webhook, and run the “IFTTT Webhook” automation in Home Assistant, turning on (of off) your relay.
- This can be tested more easily with a GPS location spoofing app on your phone.
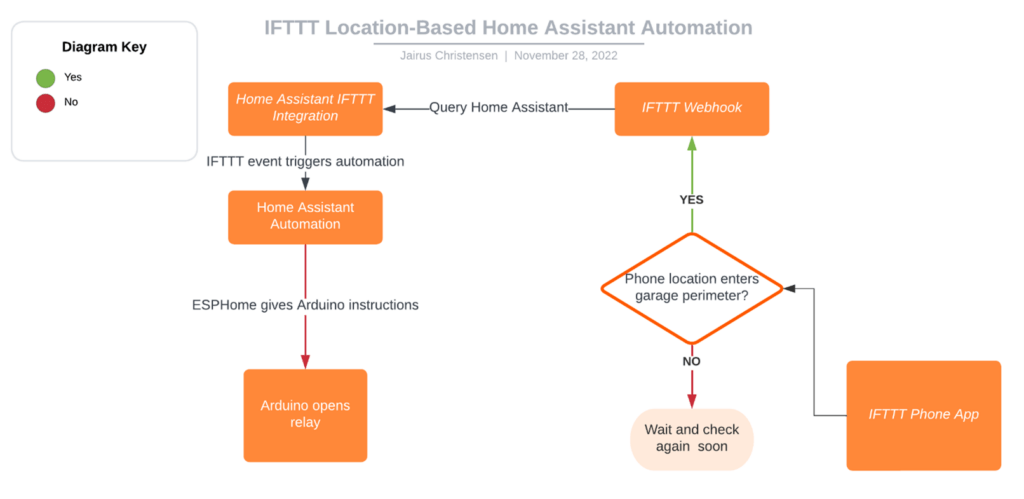
- Model the functionality, logical flow, and components of the system. Include a schematic diagram.
- Functionality – This system operates as an automation in Home Assistant and is represented by the system diagram in the appendix:
- Upon startup, the Arduino will each connect to Wi-Fi and Home Assistant.
- The Garage Door Relay Arduino will begin listening to ESPHome for commands.
- The automation in Home Assistant is as follows:
- Run whatever service is in request body on whatever entity is in request body.
- The automation in IFTTT is as follows:
- Trigger: When your phone’s location arrives at your garage.
- Action: Call “switch.turn_off” service with “switch.garage_door_relay” entity.
- System Design – The technical functions of this system are outlined in the functionality diagram included in the appendix. ESPHome takes the yaml and converts it into code for the Arduino to use. However, most of the system design is found in the automation sequence of Home Assistant and IFTTT, not in the Arduinos.
- Component Diagram and Schematic Diagram – The Arduino is represented by the “as-built” diagram in appendix E.
- Functionality – This system operates as an automation in Home Assistant and is represented by the system diagram in the appendix:
- Verify that the relay turns on when arriving at the garage.
- Optionally create another IFTTT applet that turns the relay off when leaving the garage’s area.
- Test functionality and usability
Observations
This lab was fun to do because it’s something that I can see myself using in the future – for tons of things like turning off my lights when I leave the house! I love the idea that IFTTT can call any entity service with any entity all while Home Assistant has a template automation that can handle it all. My biggest concern, however, is how expensive IFTTT pro is. I think the free version is way too limited to get a good handle on it and understand what it’s truly capable of. Because I haven’t unlocked all it can do, the value of IFTTT in my mind is much lower than what they’re asking for. I might try to use services like Adafruit IO or Amazon Lambda to accomplish the same tasks in the future if I don’t pay for IFTTT pro.
I probably didn’t have a ton of the same issues as other students on this lab because I knew how to use webhooks, I’ve used ESPHome before, and my Home Assistant website was already publicly accessible and secured. My issues were based mostly on getting through my own access rules and remembering how to use header authentication tokens. Overall though, I’m happy with my implementation and I can sleep well knowing no body can open my garage door but me!
Thought Questions
What services did you consider integrating into your project and why?
I wanted to integrate IFTTT into my project because I liked the idea of simple triggers based on devices from anywhere in the world; more specifically, my phone on cellular data! The IFTTT has triggers for so many things on my phone that location was just the easiest for this instance, but I could do many other things like this easily. I also liked that I could provide Cloudflare Authentication headers in my webhook request. The IFTTT interface made this very easy.
What services would you like to integrate in the future?
I’d like to integrate services that run on my PC in the future so that Home Assistant can know things like my CPU heat and change light colors based on that. I’d also like to integrate ZigBee devices so that I don’t need to rely on my Wi-Fi to connect everything in my home. I’d like to play with Adafruit IO to see if they can give me more functionality than IFTTT with their free tier. I’m a little turned off by IFTTT’s pricing.
Consider internal and external security threats. Identify 3 likely attack vectors for someone to compromise this system? How did you mitigate these?
An attacker could use sniffing and/or an evil twin attack to see my unencrypted internet traffic and find my webhook URL. If my website weren’t using https://, an attacker could replay a captured request or generating their own version of my request and open my garage door. Messing with it further, an attacker could also control other things in my home like lights and switches.
Another attack vector would be logging in via the Home Assistant login page. If I wasn’t using https://, my account credentials could be sniffed in transit.
A third vector could be a simple denial of service attack to the port forward, preventing IFTTT requests from being registered in a timely manner, if at all. This will always be a threat to externally available websites.
Luckily, using Cloudflare as my provider, I’m able to mitigate all three of these attack vectors. Cloudflare gives my website a certificate and redirects the traffic to https://, making sniffing impossible. A Cloudflare ZeroTrust Access Rule prevents the entire subdomain of Home Assistant from being reachable except by a Cloudflare authenticated user, meaning that my login page can’t be viewed by anyone but me. Also, Cloudflare automatically mitigates denial of service attacks and gives the website administrator Web Application Firewall rule capabilities to block malicious actors.
What was the biggest challenge you overcame in this lab?
The biggest challenge, (which I did not mention in my instructions because it was out of scope), was allowing IFTTT through my Cloudflare authentication wall. The IFTTT webhook request headers needed a specific format and my webhook kept failing when my ZeroTrust Access Rule was live. I ended up creating a new IFTTT applet and it worked, so I’m not sure what the problem was because I copy-pasted all the content from one to the other. IFTTT must have some bug in their program that I was running into. After setting the authentication headers in IFTTT right and adding braces to my request body, the IFTTT webhook request went through just fine.
Please estimate the total time you spent on this lab and report.
I spent about 4 hours on the project with 2 hours on this lab report.
Certification of Work
I certify that the solution presented in this lab represents my own work. In the case where I have borrowed code or ideas from another person, I have provided a link to the author’s work in the references and included a citation in the comments of my code. –Jairus Christensen
Appendix A: System functionality diagram
Appendix B: IFTTT request body
Appendix C: Automation YAML in Home Assistant
Appendix D: ESPHome YAML for Relay Arduino
esphome:
  name: d1mini-power-relay

esp8266:
  board: d1_mini

# Enable logging
logger:

# Enable Home Assistant API
api:
  encryption:
    key: "<hash>”

ota:
  password: "<passwd>"

wifi:
  ssid: !secret wifi_ssid
  password: !secret wifi_password

  # Enable fallback hotspot (captive portal) in case wifi connection fails
  ap:
    ssid: "D1Mini-Power-Relay"
    password: "MtbsOHv3aBtS"

captive_portal:

switch:
  - platform: gpio
    name: "Garage Door Relay"
    pin: D1
Appendix E: As-Built Diagram for Relay Arduino