Objective
The purposes of this lab are to:
- Install an open-source home automation platform
- Interface this platform via MQTT with your various devices
- Use Home Assistant to monitor the state of the garage door, and whether the car is parked in the garage.
Materials
I used the following materials to accomplish this lab:
- Home Assistant OS or Core installed on a separate machine. Can be a Virtual Machine.
- 1-3 x Mini USB cable
- All materials from Arduino GPIO Traffic Light w/ Web Server (link in references section)
- All materials from Arduino Ultrasonic Distance Sensor for HTTP Stoplight System (link in references section)
- All materials from Arduino Garage Door Sensor
References
I used the following resources in this lab:
- https://esphome.io/guides/getting_started_hassio.html – Getting started with ESPHome and Home Assistant. Great tutorial for the basics.
- https://esphome.io/components/sensor/ultrasonic.html – Good reference for ultrasonic distance sensor configurations in ESPHome.
- https://esphome.io/components/sensor/index.html – Great reference for all sensor component settings in ESPHome. This includes how to change accuracy, output values, and units.
- https://cyber-engine.com/index.php/projects/2423/ – This past lab has the wiring diagram for the garage door sensor Arduino
- https://cyber-engine.com/index.php/projects/2415/ – This past lab has the wiring diagram for the ultrasonic distance sensor Arduino
- https://cyber-engine.com/index.php/projects/2402/ – This past lab has the wiring diagram for traffic light Arduino
- https://1drv.ms/w/s!Ais81h0TsK5NhqEUuevEs8zMavzLag?e=hdaL2m – Todd Berrett’s example write-up
Procedures:
- Wire the three Arduinos as shown in the three past labs. The links for these labs are in the references section.
- Install Home Assistant OS. (This may also be done with Core but installing integrations may be harder). The instructions for this are out of scope for this writeup.
- Install the ESPHome integration under Settings > Devices and Services > Add Integration > Search for ESPHome.
- This will give you a new icon on the left-hand side of Home Assistant. This tab lets you control your ESP Arduinos.
- On the ESPHome tab in Home Assistant, create a configuration file for one of your Arduinos, including a name for it, the Wi-Fi information, etc. Download this configuration file after.
- Download the ESPHome Flasher, found here, and flash your Arduino with the configuration file downloaded in the last step. Upon booting after, the Arduino should read in the ESPHome tab as being connected. You can also view the log files wirelessly or wired (if the Arduino didn’t connect to Wi-Fi correctly) to debug.
- Repeat the last two steps for all three Arduinos.
- Connect sensors and experiment with how to get data from the magnetic reed sensor, ultrasonic distance sensor, and how to trigger the lights on the stoplight. Use the configurations helps and the yaml in the appendix to do this. You’ll need to convert the ultrasonic distance sensor’s readings to cm instead of meters. Also, it is helpful to create a dashboard to help trigger the lights and display the sensor data.
- Model the functionality, logical flow, and components of the system. Include a schematic diagram.
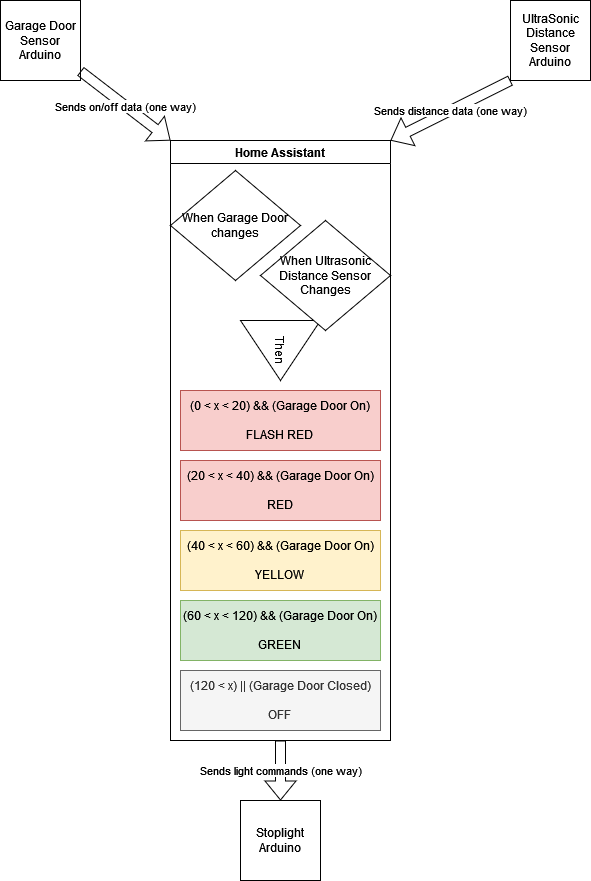
- Functionality – This system operates as an automation in Home Assistant and is represented by the system diagram in the appendix:
- Upon startup of all three Arduinos, they will each connect to Wi-Fi and Home Assistant.
- The Garage Door sensor and Ultrasonic Distance sensor Arduinos will begin sending data to Home Assistant to be processed in the automation.
- The Stoplight Arduino will wait for instructions from Home Assistant and react upon these instructions.
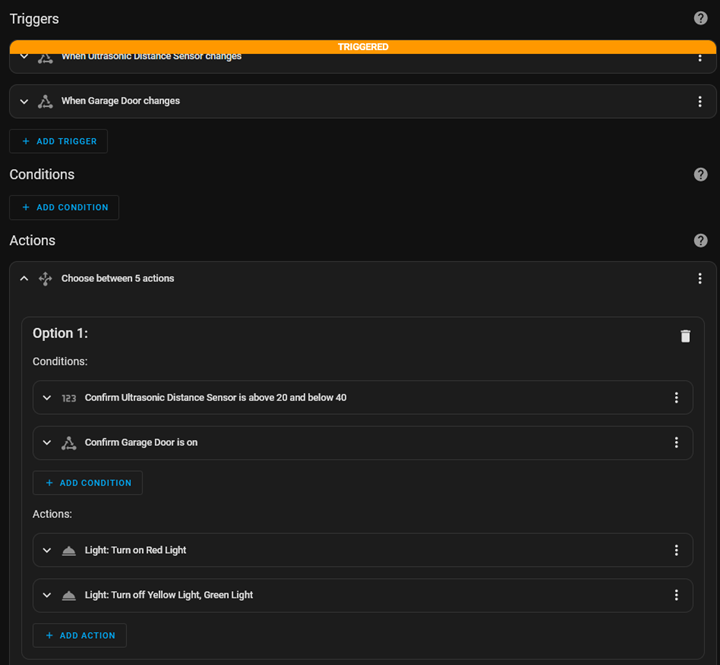
- The automation of the stoplight is as follows:
- Trigger: When the ultrasonic distance sensor changes or the garage door changes
- Actions:
- Condition: Ultrasonic Distance Sensor is above 0 and below 20 AND garage door is on.
- Action: Turn on red light, turn off yellow and green lights, delay 250ms, turn off red light, delay 250ms
- Condition: Ultrasonic Distance Sensor is above 20 and below 40 AND garage door is on.
- Action: Turn on red light, turn off yellow and green lights.
- Condition: Ultrasonic Distance Sensor is above 40 and below 60 AND garage door is on.
- Action: Turn on yellow light, turn off red and green lights.
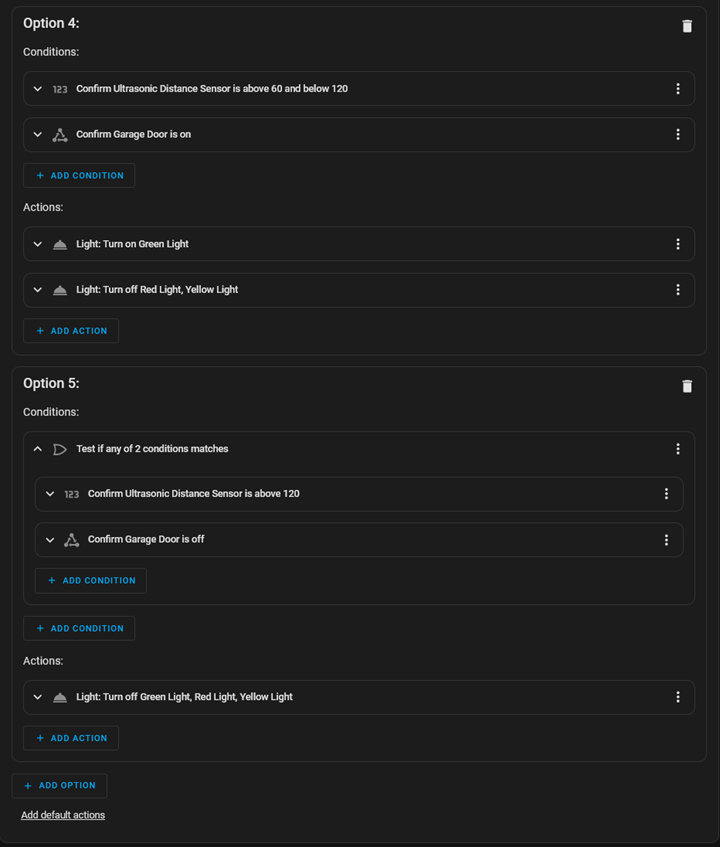
- Condition: Ultrasonic Distance Sensor is above 60 and below 120 AND garage door is on.
- Action: Turn on green light, turn off red and yellow lights.
- Condition: Ultrasonic Distance Sensor is above 120 OR garage door is off.
- Action: Turn on all lights.
- Condition: Ultrasonic Distance Sensor is above 0 and below 20 AND garage door is on.
- System Design – The technical functions of this system are outlined in the yaml files included in the appendix. ESPHome takes the yaml and converts it into code for each of the Arduinos to use. Most of the system design is found in the automation sequence of Home Assistant, not in the Arduinos.
- Component Diagram and Schematic Diagram – Each Arduino is represented by the similar “as-built” diagram in the appendixes of the past labs, showing a physical component diagram. The stoplight, ultrasonic distance sensor, and garage door sensor Arduinos are wired the same as they were in previous labs (see references sections for links to these three past labs)
- Functionality – This system operates as an automation in Home Assistant and is represented by the system diagram in the appendix:
- Verify that the ultrasonic distance sensor and reed sensor trigger the automation.
- Verify that the ultrasonic distance sensor’s readings change the led on the stoplight.
- Verify that the reed sensor being closed will turn off the stoplight when closed.
- Create a gauge in the Home Assistant dashboard to display the ultrasonic distance sensor’s readings. Set severity levels so that it accurately displays the red, yellow, and green stages.
- Test functionality and usability
Observations
This lab was ridiculously simple thanks to the genius of ESPHome and Home Assistant. I’m blown away by the simplicity of ESPHome and how I can create complex systems with Arduinos without ever needing to code. I’m also impressed with the wireless log watching and software flashing features which are life savers when using many Arduinos. The hardest part for me was figuring out the YAML files, but the articles in my references section solved all my questions. The second-hardest part was creating the automation conditions because I didn’t know what I could and couldn’t do in HA. Clicking around for a while solved that issue. I love that the interface is intuitive enough that one can click around and find their own answers.
I’m happy with my decision to do this lab with ESPHome and it made the process very simple. I’d recommend this over hardcoding the Arduinos for systems such as this.
I’ve already begun to use HA for home automation outside of class and with the basics this lab has taught me I’ve been able to do some impressive lighting and media automations. I’m satisfied with these technologies and I wish more people knew about them!
Thought Questions
Which version of Home Assistant did you choose to install? (Home Assistant Operating System, Home Assistant Container or one of the more experienced versions) Why did you choose this version?
I went with Home Assistant OS in a virtual machine (as opposed to doing it in Docker) because having HA directly on the LAN provides me with more plug-and-play options. For example, it automatically detected my printer. Also, it reduces the complexity of my set up, especially when the docker-network IP addresses change. When I was running HA in docker, I had it set up with integrations connecting to other docker containers which was great until I rebooted my UNRAID PC and the internal docker IP addresses changed. On my LAN, however, I can control what these IP addresses are, and they don’t change.
I also chose HA OS because it more easily allows for integrations, add-ons, and other configuration options. I have a ZigBee dongle for the Home Assistant OS, and that is much easier to route to a Virtual Machine than to a docker container as well.
How should you decide which logic to perform in Home Assistant versus coding the logic directly into the devices? What guiding principles would you establish for future devices?
You should divide the logic among the devices as much as possible while maintaining simplicity. For example, I decided that I wanted my ultrasonic distance sensor Arduino to convert its output to cm instead of m so that I wouldn’t need to do that conversion on HA. However, all the automation and large logic decisions for the system were on Home Assistant. As a rule of thumb, you can put your Arduino-specific logic on the Arduino but leave all the system logic on Home Assistant.
I would follow this logic on future devices as well since this has worked well for me.
What features do you like the most about Home Assistant?
I love how many integrations and add-ons there are for Home Assistant. I’m able to hook everything up in my house including my Roku, Printer, ChromeCast, Self-Hosted Server apps, and more.
Please estimate the total time you spent on this lab and report.
I spent about 3 hours on the project with 2 hours on this lab report.
Certification of Work
I certify that the solution presented in this lab represents my own work. In the case where I have borrowed code or ideas from another person, I have provided a link to the author’s work in the references and included a citation in the comments of my code. –Jairus Christensen
Appendix A: System Functionality Diagram
Appendix B: Home Assistant Dashboard

Appendix C: Home Assistant Automation

Appendix D: ESPHome YAML for Stoplight Arduino
esphome:
  name: d1mini-stoplight
esp8266:
  board: d1_mini
# Enable logging
logger:
# Enable Home Assistant API
api:
  encryption:
    key: "<hash>"
ota:
  password: "<hash>"
wifi:
  ssid: !secret wifi_ssid
  password: !secret wifi_password
  # Enable fallback hotspot (captive portal) in case wifi connection fails
  ap:
    ssid: "D1Mini-Stoplight"
    password: "TyzcOOsBEkJP"
captive_portal:

light:
  - platform: status_led
    name: "Red Light"
    pin: D3
  - platform: status_led
    name: "Yellow Light"
    pin: D2
  - platform: status_led
    name: "Green Light"
    pin: D1
Appendix E: ESPHome YAML for Ultrasonic Distance Sensor Arduino
esphome:
  name: d1mini-ultrasonic-distance
esp8266:
  board: d1_mini
# Enable logging
logger:
# Enable Home Assistant API
api:
  encryption:
    key: "<hash>"
ota:
  password: "<hash>"
wifi:
  ssid: !secret wifi_ssid
  password: !secret wifi_password
  # Enable fallback hotspot (captive portal) in case wifi connection fails
  ap:
    ssid: "D1Mini-Ultrasonic-Distance"
    password: "ifvvpadFQ1sI"
captive_portal:

sensor:
  - platform: ultrasonic
    trigger_pin: D3
    echo_pin: D2
    name: "Ultrasonic Distance Sensor"
    update_interval: 0.1s
    unit_of_measurement: "cm"
    filters:
      - median:
          window_size: 10
          send_every: 5
          send_first_at: 5
      - multiply: 100
Appendix F: ESPHome YAML for Garage Door Sensor Arduino
esphome:
  name: d1mini-door-sensor
esp8266:
  board: d1_mini
# Enable logging
logger:
# Enable Home Assistant API
api:
  encryption:
    key: "<hash>"
ota:
  password: "<hash>"
wifi:
  ssid: !secret wifi_ssid
  password: !secret wifi_password
  # Enable fallback hotspot (captive portal) in case wifi connection fails
  ap:
    ssid: "D1Mini-Door-Sensor"
    password: "BXyAaJuEqeGG"
captive_portal:

binary_sensor:
  - platform: gpio
    pin:
      number: D1
      mode: INPUT_PULLUP
      inverted: False
    name: "Garage Door"