
Objective
The purposes of this lab are to:
- Implement an Event Hub for publish/subscribe notifications between devices.
- Develop a communications protocol for devices across the event bus.
- Establish more complex conditions for the actuator involving multiple sensors.
Materials
I used the following materials to accomplish this lab:
- Wemos D1 Mini Arduino
- Raspberry Pi
- 1 x breadboard
- 1x Jumper Wire
- 1x Mini USB cable
- All materials from Arduino GPIO Traffic Light w/ Web Server (link in references section)
- All materials from Arduino Ultrasonic Distance Sensor for HTTP Stoplight System (link in references section)
References
I used the following resources in this lab:
- https://www.instructables.com/How-to-Use-MQTT-With-the-Raspberry-Pi-and-ESP8266/ – Great walkthrough for how to install Mosquitto MQTT on a Raspberry Pi and publish/subscribe to MQTT events on Arduinos like the D1 mini.
- https://randomnerdtutorials.com/monitor-your-door-using-magnetic-reed-switch-and-arduino/ – Contains example code for how to use magnetic Reed Switch.
- https://cyber-engine.com/index.php/projects/2402/ – Arduino GPIO Traffic Light w/ Web Server (previous project)
- https://cyber-engine.com/index.php/projects/2415/ – Arduino Ultrasonic Distance Sensor for HTTP Stoplight System (previous project)
- https://1drv.ms/w/s!Ais81h0TsK5NhqEUuevEs8zMavzLag?e=hdaL2m – Todd Berrett’s example write-up
Procedures:
- Install Arduino’s latest IDE
- Install the ESP8266 core library as a remote repository in Arduino IDE.
- Install the PubSubClient library found in the Arduino IDE’s large list of available libraries.
- Verify which port your Arduino will be using once plugged into the computer with Device Manager (if on Windows)
- Model the functionality, logical flow, and components of the system. Include a schematic diagram.
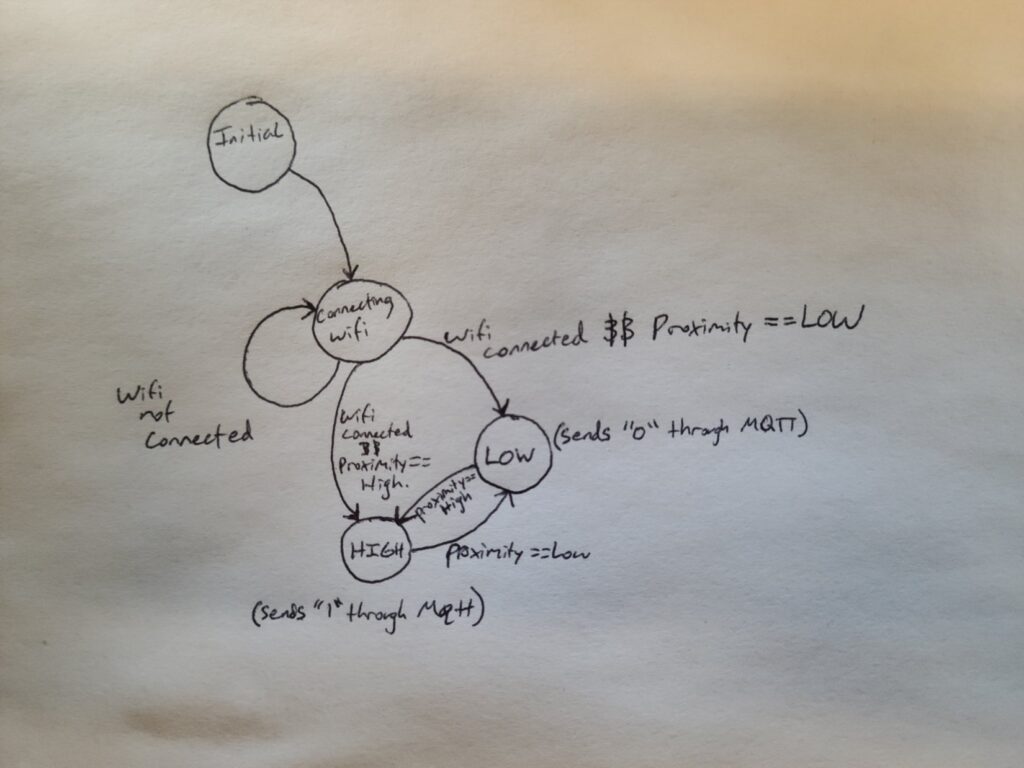
- Functionality – This system is a basic state machine, represented by the state diagram in the appendix:
- Upon startup, the machine will connect to Wi-Fi and the MQTT Broker, then immediately start detecting the Reed Signal’s state and sending MQTT requests.
- Machine will stay in the “Wifi Connecting…” state until WiFi has been connected and MQTT Broker has been found.
- While in either HIGH or LOW state:
- If proximity == HIGH, move/stay into HIGH state
- If proximity == LOW, move/stay into LOW state
- Run SendCommand() function with either 1 or 0 (HIGH is 1, LOW 0) to MQTT publish to stoplight_ctl topic.
- System Design – The technical function of this system is outlined in the code found in the appendix. The main points of the code is the MQTT publish is in the function titled SendCommand().
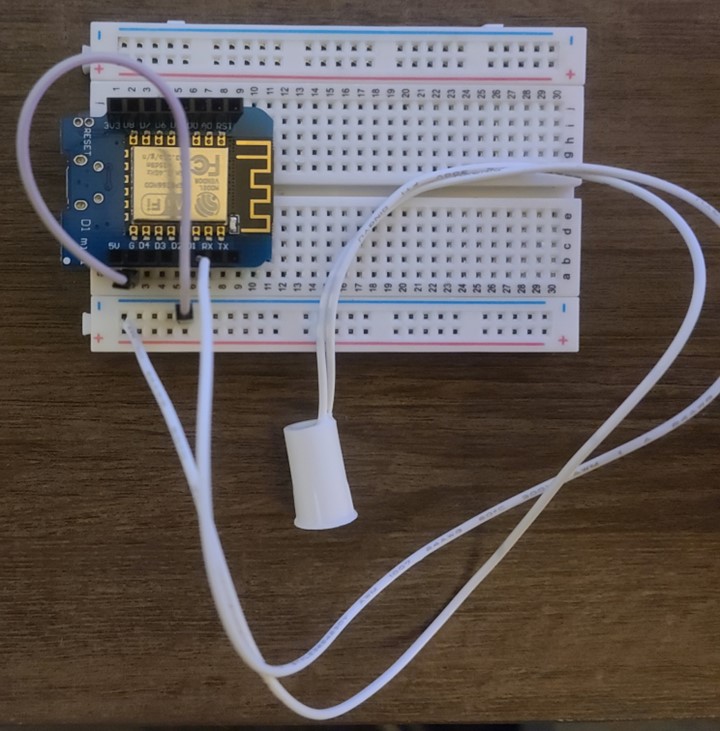
- Component Diagram and Schematic Diagram – The garage magnet sensor Arduino is represented by the similar “as-built” diagram in the appendix, showing a physical component diagram. The stoplight and ultrasonic distance sensor Arduinos are wired the same as they were in previous labs (see references sections for links to these two past labs)
- Functionality – This system is a basic state machine, represented by the state diagram in the appendix:
- Follow the first resource to get Mosquitto MQTT running on your Raspberry Pi.
- Verify that the instance of Mosquitto is visible to the LAN by connecting to it on MQTT Explorer on another computer.
- Follow the first resource under ‘References’ to get a basic understanding of how MQTT communications works. Send local MQTT publish commands on the Raspberry Pi’s terminal and verify that you can see these commands in MQTT Explorer.
- Edit the code from the Stoplight Web Server to use MQTT Subscription instead of being a web server. Use the example in the first resource to see how this works.
- If the code from the last step works, you can now run MQTT publish commands on the Raspberry Pi on the right topic to change the stoplight’s color. Verify that the “auto” cycle still work with this setup.
- Edit the code from the Ultrasonic Distance Sensor to be a MQTT publisher instead of making web requests. Once this works, it should be able to change the stoplights colors when both use the same MQTT topic.
- Wire the third Arduino which will have a Reed Sensor (see as built diagram in appendix)
- Use the second resource to learn how to read the state of the reed sensor.
- Use a similar approach to MQTT publishing as was done for the Ultrasonic Distance Sensor.
- Add logic to the Stoplight Arduino to turn off all the lights and stay in an off state while the reed sensor Arduino publishes ‘closed’ while staying on when the reed sensor Arduino publishes ‘open’.
- Verify that the reed sensor being closed will turn off the stoplight when closed.
- Test functionality and usability
Observations
This lab much more complex than the last couple labs simply because it had many moving parts between 3 Arduinos and a Raspberry Pi. The system-level understanding was fun to learn though, especially when things started working! The move to MQTT from HTTP was welcome and transforming the stoplight and ultrasonic distance sensor Arduinos was relatively easy. The code on these Arduinos is now much more simple and I love that.
I also like that the central point of communication in the MQTT Broker makes communication so much more scalable. The code on these different Arduinos doesn’t need to change when an IP address changes, and that’s a very welcome concept to me who (for every pass-off thus far) has had to change the IP addresses on these Arduinos right before presenting because of new IPs.
This project focused on the communication system of the stoplight, ultrasonic distance sensor, and reed sensor Arduinos, which was different from the previous project’s single machine scope. For this lab to work, all three Arduino’s code needed to be edited so that they could work together as a system.
Thought Questions
How does the communication between devices change with the shift to using an event hub? How does this facilitate greater scalability? What things did you do to learn to use MQTT?
The event hub simplifies the process greatly, coming from an HTTP background in past labs. I love that the Arduinos don’t need to talk with each other, just the hub. This allows for a desktop program like MQTT Explorer to view all the MQTT topics for easy debugging. HTTP could have multiple machines sending data (publishers) to a single receiver (subscriber), but that subscriber needed to be a server and the publishers needed to reach that server! MQTT simplifies that down to a single point of communication while allowing the receiver to be a simple subscriber and remove the need to be a web server. Unlike HTTP, MQTT allows for multiple subscribers! To make something like this work in HTTP, the Arduinos would need to query each other and whenever a new one is added, the code for ALL of them would need to account for that. With MQTT, another subscriber can be added without needing to be a server and without needing to edit the code of any publishers. The scalability is immense because now one can add a ton of subscriber Arduinos with the same code to a system and they’ll all work the same right from the start.
To learn MQTT, I followed the linked websites to see the concept, then I played around with it locally on the Raspberry Pi by sending terminal commands to publish data. I viewed that data in MQTT explorer to verify that it worked. I then set my stoplight to subscribe to MQTT instead of being a web server and changed the colors of the stoplight with my RPi terminal. Learning how to publish on an Arduino had a similar process.
What are strengths and weaknesses of the direct communication between the sensor and actuator? What are strengths and weaknesses of the event hub? Which do you feel is better for this application?
Many of the weaknesses of a direct connection are explained in the last answer; mainly, every sensor and actuator would need to have a direct connection to one another, which is annoying. Also, the code needs to change whenever an IP address changes. The main strength is that there isn’t a single point of failure, like when using an event hub. That’s an event hub’s main weakness. The strengths of an event hub are explained in the last answer; mainly that it allows the system to be scalable and the code for every actuator and sensor can be identical and more efficient.
What was the biggest challenge you overcame in this lab?
My biggest challenge was wiring the Reed Sensor up correctly. Although my wiring was correct, the metal wasn’t contacting well enough for it to function properly. I checked and re-checked my code to verify that I had done it right. After using a classmate’s sensor, I learned that my code was perfect, my sensor just wasn’t making enough contact.
Another problem I had was that I wanted to use my RPi as an access point so I could move this ecosystem of Arduinos to school and have it work with the same code for my pass-off. Until this point, I’ve used Blake or Todd’s WiFi hotspot and needed to edit the IP addresses in my code. I didn’t want this to be a problem, so I took the time to reformat my RPi and set up an antenna for it in AP mode to act as my hotspot while also acting as the MQTT broker. This took more time that I expected.
The rest of the lab I was able to do surprisingly well and without hiccups.
Please estimate the total time you spent on this lab and report.
I spent about 3 hours on the project with 2 hours on this lab report.
Certification of Work
I certify that the solution presented in this lab represents my own work. In the case where I have borrowed code or ideas from another person, I have provided a link to the author’s work in the references.
–Jairus Christensen
Appendix A: State Diagram
Appendix B: Physical Component Diagram
Appendix C: Garage Door (Reed) Sensor Code
#include <ESP8266WiFi.h>
#include <PubSubClient.h> // Allows us to connect to, and publish to the MQTT broker

const int REED_PIN = D1;  // Pin connected to reed switch

// wifi pass
const char* ssid = "<ssid>";
const char* password = "<passwd>";

const char* mqtt_server = "10.42.0.1"; // ip address of Pi AP
const char* mqtt_topic = "stoplight_ctl";
const char* clientID = "arduino_magnet";

// Initialise the WiFi and MQTT Client objects
WiFiClient wifiClient;
PubSubClient client(mqtt_server, 1883, wifiClient); // 1883 is the listener port for the Broker

void sendCommand(char* command) {
  if (WiFi.status() == WL_CONNECTED) {
    // PUBLISH to the MQTT Broker (topic = mqtt_topic, defined at the beginning)
    // Here, "Button pressed!" is the Payload, but this could be changed to a sensor reading, for example.
    if (client.publish(mqtt_topic, command)) {
      // Serial.println("Sent message");
    }
  } else {
    Serial.println("WiFi Disconnected");
  }
}

void setup() {
  Serial.begin(115200);
  pinMode(REED_PIN, INPUT_PULLUP);  // Enable internal pull-up for the reed switch
  pinMode(LED_BUILTIN, OUTPUT);

  WiFi.begin(ssid, password);
  Serial.println("Connecting");
  while(WiFi.status() != WL_CONNECTED) {
    delay(500);
    Serial.print(".");
  }
  Serial.println("");
  Serial.print("Connected to WiFi network with IP Address: ");
  Serial.println(WiFi.localIP());

  // Connect to MQTT Broker
  // client.connect returns a boolean value to let us know if the connection was successful.
  if (client.connect(clientID)) {
    Serial.println("Connected to MQTT Broker!");
  }
  else {
    Serial.println("Connection to MQTT Broker failed...");
  }
}

void loop() {
  int proximity = digitalRead(REED_PIN); // Read the state of the switch
  // Serial.println(proximity);

  // If the pin reads low, the switch is closed.
  if (proximity == LOW) {
    Serial.println("Switch closed");
    digitalWrite(LED_BUILTIN, HIGH);  // Turn the LED on
    sendCommand("0");
  }
  else {
    Serial.println("Switch opened");
    digitalWrite(LED_BUILTIN, LOW);   // Turn the LED off
    sendCommand("1");
  }
  delay(1000);
}
Appendix D: Serial Monitor Output
...........
Connected to WiFi network with IP Address: 10.42.0.92
Connected to MQTT Broker!
Switch opened
Switch closed
Switch closed
Switch closed
Switch opened
Switch opened
Switch closed
Switch closed
Switch opened
Switch opened
Switch opened
Switch opened
Switch closed
Switch closed
Switch closed
Switch opened
Switch opened
Switch opened
Switch opened
Switch opened
Switch opened
Switch opened
Appendix E: Edited Stoplight Code (using MQTT instead of HTTP Web Server)
#include <ESP8266WiFi.h>
#include <PubSubClient.h> // Allows us to connect to, and publish to the MQTT broker

// wifi pass
const char* ssid = "<ssid>";
const char* password = "<passwd>";

const char* mqtt_server = "10.42.0.1"; // ip address of Pi AP
const char* mqtt_topic = "stoplight_ctl";
const char* clientID = "arduino_stoplight";

// Initialise the WiFi and MQTT Client objects
WiFiClient wifiClient;
PubSubClient client(mqtt_server, 1883, wifiClient); // 1883 is the listener port for the Broker

int cycleValue;
unsigned long start;
bool cycle = false;
bool on = true;
int green = D2;
int yellow = D3;
int red = D4;
int msToBeRed = 5000;
int msToBeGreen = 5000;
int msToBeYellow = 2000;
void allLightsOff() {
  digitalWrite(green, LOW);
  digitalWrite(yellow, LOW);
  digitalWrite(red, LOW);
}
void greenLight() {
  digitalWrite(green, HIGH);
  digitalWrite(yellow, LOW);
  digitalWrite(red, LOW);
}
void yellowLight() {
  digitalWrite(green, LOW);
  digitalWrite(yellow, HIGH);
  digitalWrite(red, LOW);
}
void redLight() {
  digitalWrite(green, LOW);
  digitalWrite(yellow, LOW);
  digitalWrite(red, HIGH);
}

void ReceivedMessage(char* topic, byte* payload, unsigned int length) {
  if (length != 1) {
    Serial.println("Payload needs 1 character");
  }
  else if (((char)payload[0] == 'r') && (on == true)) {
    cycle = false;
    redLight();
    Serial.println("Red Selected");
  }
  else if (((char)payload[0] == 'g') && (on == true)) {
    cycle = false;
    greenLight();
    Serial.println("Green Selected");
  }
  else if (((char)payload[0] == 'y') && (on == true)) {
    cycle = false;
    yellowLight();
    Serial.println("Yellow Selected");
  }
  else if ((char)payload[0] == 'o') {
    cycle = false;
    Serial.println("Off Selected");
    allLightsOff();
  }
  else if ((char)payload[0] == 'a') {
    cycle = true;
    start = millis();
    Serial.println("Auto Selected");
  }
  else if ((char)payload[0] == '1') {
    on = true;
    Serial.println("Garage Door Open");
  }
  else if ((char)payload[0] == '0') {
    on = false;
    allLightsOff();
    Serial.println("Garage Door Closed");
  }
  else {
    Serial.println("Payload not understood");
  }
}

bool Connect() {
  // Connect to MQTT Server and subscribe to the topic
  if (client.connect(clientID)) {
      client.subscribe(mqtt_topic);
      return true;
    }
    else {
      return false;
  }
}

void setup() {
  //Setup serial and all LED outputs then clears the LEDs
  Serial.begin(115200);
  pinMode(green, OUTPUT);
  pinMode(yellow, OUTPUT);
  pinMode(red, OUTPUT);
  allLightsOff();
  //Using the Wifi library begin connecting to the set network and provide status updates.
  Serial.print("Connecting to ");
  Serial.println(ssid);
  WiFi.begin(ssid, password);
  while (WiFi.status() != WL_CONNECTED) {
    delay(500);
    Serial.print(".");
  }
  Serial.println();
  Serial.println("(( WiFi connected ))");
  Serial.println(WiFi.localIP());

  // Connect to MQTT Broker
  // setCallback sets the function to be called when a message is received.
  client.setCallback(ReceivedMessage);
  if (Connect()) {
    Serial.println("Connected Successfully to MQTT Broker!");
  }
  else {
    Serial.println("Connection Failed!");
  }
}

void loop() {
  // If the connection is lost, try to connect again
  if (!client.connected()) {
    Connect();
  }
  // client.loop() just tells the MQTT client code to do what it needs to do itself (i.e. check for messages, etc.)
  client.loop();

  if ((cycle == true) && (on == true)) {
    unsigned long now = millis();
    unsigned long timeSinceStart = now - start;
    // Serial.println(timeSinceStart);
    if (timeSinceStart < msToBeRed) {
      redLight();
    }
    if ((timeSinceStart >= msToBeRed) && (timeSinceStart < (msToBeRed + msToBeGreen))) {
      greenLight();
    }
    if ((timeSinceStart >= (msToBeRed + msToBeGreen) && (timeSinceStart < (msToBeRed + msToBeGreen + msToBeYellow)))) {
      yellowLight();
    }
    if (timeSinceStart >= (msToBeRed + msToBeGreen + msToBeYellow)) {
      start = millis();
    }
  }
}
Appendix F: Edited Ultrasonic Distance Sensor Code (using MQTT instead of HTTP)
#include <HCSR04.h>
#include <ESP8266WiFi.h>
#include <PubSubClient.h> // Allows us to connect to, and publish to the MQTT broker

#define echoPin D2 // attach pin D2 Arduino to pin Echo of HC-SR04
#define trigPin D3 //attach pin D3 Arduino to pin Trig of HC-SR04
#define numberOfDistancesToAverage 5

HCSR04 hc(D3, D2); //initialisation class HCSR04 (trig pin , echo pin)

// wifi pass
const char* ssid = "<ssid>";
const char* password = "<passwd>";

const char* mqtt_server = "10.42.0.1"; // ip address of Pi AP
const char* mqtt_topic = "stoplight_ctl";
const char* clientID = "arduino_ultrasonic";

// Initialise the WiFi and MQTT Client objects
WiFiClient wifiClient;
PubSubClient client(mqtt_server, 1883, wifiClient); // 1883 is the listener port for the Broker

bool tooClose = false;
int i = 0;
float times[ numberOfDistancesToAverage ] = {0.0};

void sendCommand(char* command) {
  if (WiFi.status() == WL_CONNECTED) {
    // PUBLISH to the MQTT Broker (topic = mqtt_topic, defined at the beginning)
    // Here, "Button pressed!" is the Payload, but this could be changed to a sensor reading, for example.
    if (client.publish(mqtt_topic, command)) {
      Serial.println("Sent message");
    }
  } else {
    Serial.println("WiFi Disconnected");
  }
}

void setup() {
  Serial.begin(115200);

  WiFi.begin(ssid, password);
  Serial.println("Connecting");
  while(WiFi.status() != WL_CONNECTED) {
    delay(500);
    Serial.print(".");
  }
  Serial.println("");
  Serial.print("Connected to WiFi network with IP Address: ");
  Serial.println(WiFi.localIP());

  // Connect to MQTT Broker
  // client.connect returns a boolean value to let us know if the connection was successful.
  if (client.connect(clientID)) {
    Serial.println("Connected to MQTT Broker!");
  }
  else {
    Serial.println("Connection to MQTT Broker failed...");
  }
}

void loop() {
  tooClose = false;
  float distance = hc.dist();
  times[i] = distance;
  float avgDistance = findAverage(times);
  Serial.print("i: ");
  Serial.print(i);
  Serial.print(" -- Distance: ");
  Serial.print(distance);
  Serial.print("cm -- avgDistance: ");
  Serial.print(avgDistance);
  Serial.print("cm -- stoplight will ");
  if ( avgDistance < 20 && avgDistance > 0) {
    tooClose = true;
    Serial.print("blink");
  }
  else if ( avgDistance >= 20 && avgDistance < 40) {
    sendCommand("r");
    Serial.print("be red");
  }
  else if ( avgDistance >= 40 && avgDistance < 60) {
    sendCommand("y");
    Serial.print("be yellow");
  }
  else if ( avgDistance >= 60 && avgDistance < 100) {
    sendCommand("g");
    Serial.print("be green");
  }
  else if ( avgDistance >= 100) {
    sendCommand("o");
    Serial.print("be off");
  }
  else {
    Serial.print("Error: AvgDistance was ");
    Serial.print(avgDistance);
    Serial.print(".");
  }
  Serial.print("\n");
  if(tooClose) {
    sendCommand("o");
    delay(300);
    sendCommand("r");
  }
  delay(300);
  i = (i + 1) % (numberOfDistancesToAverage);
}

float findAverage(float* times) {
  float total = 0.0;
  for(int j = 0; j < (numberOfDistancesToAverage); j++) {
    total += times[j];
  }
  return total / numberOfDistancesToAverage;
}