
Installation
- With windows dual boot, go into windows > computer management > disk management and shrink the main partition to make room for you entire Linux install. Then boot onto the USB key.
- NVIDIA card: boot with proprietary drivers
- Anything else: boot with open-source drivers
- Partition automatically to BTRFS, with Hibernation Swap Partition
- Install and reboot!
Hard-Copying over files from previous install (no backup, just the files)
You’ll copy over your documents, desktop, downloads, pictures, videos, and other folders to your home directory as such. Don’t copy over OneDrive, Dropbox, or other cloud services because they’ll duplicate themselves if you do that.
For example, I would cd over to the disk where my files are backed up, then use this to copy it over to my home folder.
sudo cp -R Documents ~/Now, you need permission to these files you just copied over (that currently belong to sudo)
sudo chown -R <your username> ~/*If your username is line6, it would be sudo chown -R line6 ~/*
Start Configuration
- Open “Add/Remove Software” > Settings Icon > Preferences
- Set Mirrors to United States and refresh databases.
- Turn on AUR, Snap, and Flatpak support for “Add/Remove Software” (which is actually called Pamac if you care)
sudo pacman -S base-develThis will install the necessary components to build your own applications, which you’ll do shortly.
sudo pacman -S yayThis package manager, Yay, will be your best friend
sudo pacman -Syyuu- This is a command to use the default package manager to do a full upgrade. Whenever Pacman or Yay asks for input, you can usually hit Enter and be fine.
- On Firefox, visit the Gnome Extensions Website. Install the gnome shell integration, then go to Installed Extensions > Update them
- Reboot
How to use Yay (learn this now)
You can install each of the following packages with Yay <package name> in the terminal. It will automatically do a search and you can select which packages you want to install. If you ever want to uninstall something, use Yay -R <package name>. If you don’t know the exact package name you can use sudo pacman -Qs <search a word or two> to search for a package internally.
Configure NVIDIA Graphics Card and Graphics Switching (if necessary)
Only do this if you have an NVIDIA card with Optimus capability
Install these packages if NVIDIA card is present
gdm-plymouth-primeorgdm-prime(it will have you removegdmand/orlibgdm. This is fine)- You may want to install a different display manager altogether since
gdmisn’t patched and thisgdm-primeversion still has issues after hibernation sometimes. Here are instructions on how to install these other display managers.
- You may want to install a different display manager altogether since
optimus-manager(enable this)optimus-manager-qt(use this to set preferences. You may need to turn on the Unite extension to see the icon at times.)- Set switching to: none.
- Set NVIDIA card to allow external GPUs (not really necessary)
- Enable Triple Buffering (supposedly it boots faster)
- Set NVIDIA power management to fine.
- Why? Read this
- With this on you actually save almost the same amount of battery as you would in Integrated mode while in Hybrid mode.
optimus-manager-indicator(gnome-extension found on Gnome Extension’s Website)
For graphics switching to work, you’ll need to turn off Wayland and use just X11. You can simply change this line in /etc/gdm/custom.conf
WaylandEnable=falseReboot and verify that Gnome is using X11 in Gnome-Settings > About.
If you’re using a display manager other than gdm then you’ll need to select Gnome on Xorg at the login page instead of Gnome on Wayland
It should work not by default with the Nouvaeu or “none” switching method. For reference, the instructions are here: https://wiki.manjaro.org/index.php/Optimus_Manager
We’re also going to set an NVIDIA setting to help it be more powerful. The guide for this is found here.
- Change the
/etc/X11/xorg.conf.d/10-optimus-manager-conffile. The Device section should have this line added.
Option "TripleBuffer" "true"Now, sleep settings will be messed up on the NVIDIA card without running this command…
sudo systemctl enable nvidia-suspend nvidia-hibernate nvidia-resumeConfigure Sleep/Hibernate Settings
- Make sure you’ve installed
linux-rt-manjaro-acpi_call. - Also install and enable the Hibernate Status Button extension from the Gnome Extension Website
You can set sleep settings in /etc/systemd/sleep.conf. Add something like this to the bottom, leaving everything else alone. Everything already in that file are the system defaults.
# AllowSuspend=yes
# AllowHibernation=yes
# AllowSuspendThenHibernate=yes
# AllowHybridSleep=yes
# SuspendMode=
SuspendState=mem standby freeze

HibernateMode=shutdown
HibernateState=disk
HibernateDelaySec=40min

HybridSleepMode=suspend
HybridSleepState=freeze
This example makes these modes happen:
- Suspend goes into the
mempower state, where everything shuts off but the RAM. - Hibernate goes into a full shutdown and saves the RAM’s data to the disk
HibernateDelaySecdefines how long until the system hibernates after it suspends if suspend-then-hibernate is ever selected. It’s a timeout for full shutdown when suspended.HybridSleepModeis usually where it stores the RAM data into the disk AND memory and stays in a suspend mode until the battery dies. When that battery dies, it will have everything saved on the disk so it can still give the session back. I’ve changed this mode to be something else completely. In this example,HybridSleepModewill stop the computer from thinking and will freeze itself. It consumes more power than a normal suspend, but can be started more quickly.- NOTE: When there are multiple parameters on a single line, like
SuspendState=mem standby freezeit means that the system will try the first one, then if it fails, move on to the second one.
Let’s change the suspend settings for when the laptop lid is closed. We want to be able to use it with an external display when it’s either docked (thunderbolt connection) or on external power (usb-c or hdmi connection).
- Add this to the bottom of
/etc/systemd/logind.conf
HandleLidSwitchDocked=ignore
HandleLidSwitchExternalPower=ignore- Reboot before you expect to see any changes.
Go ahead and reboot, then test it out. If it doesn’t work, you may need to run a short script for this to function properly. Save this file in .sh format, make it executable with sudo chmod a+x <filename>.sh , then run it as sudo. It will add an extra boot parameter so that Linux knows how to talk to the Windows-based BIOS through it’s API, which changes from time to time. The BIOS may just be a different version than Linux thinks it is without this boot parameter. Look at ACPI parameters for more details. Here’s a forum post on it.
#!/bin/sh
VERSION="$(sudo strings /sys/firmware/acpi/tables/DSDT | grep -i 'windows ' | s>
echo 'Linux kernel command-line options required: acpi_osi=! "acpi_osi='$VERSIO>
read -p "Do you want to add this setting (y/n) ? " answer
if [ x$answer != xY -a x$answer != xy ]; then
  exit 1
fi
echo "Existing Command Line: ` sed -n '/.*linux[[:space:]].*root=\(.*\)/{s//BOO>
if grep -m 1 'acpi_osi=Windows' -q /etc/default/grub; then
  echo "There is already an entry; please remove it from /etc/default/grub and >
  exit 2
fi
sudo sed -i "s/^\(GRUB_CMDLINE_LINUX=.*\)\"$/\1 acpi_osi=! \\\\\"acpi_osi=$VERS>
echo "Modified Command Line: ` sed -n '/.*linux[[:space:]].*root=\(.*\)/{s//BOO>
sudo update-grub
NVIDIA USERS:
sudo systemctl enable nvidia-suspend nvidia-hibernate nvidia-resumePLEASE READ:
Before you spend a significant amount of time installing and setting up your apps, accounts, etc, thoroughly make sure that sleep settings and graphics switching not only work, but work in parallel.
Good tests are:
- hibernate in NVIDIA mode and power on in integrated mode. If successful, the fonts and symbols will all be wonky.
- hibernate in NVIDIA mode and power on in hybrid mode. If successful, it will boot in NVIDIA mode instead of hybrid mode.
- hibernate in integrated mode and power on in NVIDIA mode. If successful, it will boot in integrated mode instead of NVIDIA mode.
- Make sure Suspend and Hybrid-Sleep in work in both Integrated and NVIDIA modes as well.
Install Packages: A List
Apps and helper components
vivaldi(optional:vivaldi-ffmpeg-codecs, vivaldi-update-ffmpeg-codecs)mutter-x11-scalingANDgnome-control-center-x11-scaling(gnome xorg fractional scaling fix)- Then, run
gsettings set org.gnome.mutter experimental-features "['x11-randr-fractional-scaling']"
- Then, run
gnome-remote-desktop(VNC remote desktop)manjaro-settings-sambaNautilus-share(allows you to right click on a folder and share it via SAMBA)DropboxNautilus-DropboxJoplin(get by runningwget -O - https://raw.githubusercontent.com/laurent22/joplin/dev/Joplin_install_and_update.sh | bash)OneDriveOnedrive_tray-gitNtfs-3g-OneDrive-binGnome-session-properties(used for managing startup apps/scripts)BraveChromiumgoogle-chromeSlack-desktopFlameshot(screenshots)Minetime-bin(calendar app)Mailspring-libre(email client)rambox-bin(manages all social media accounts)vimgeditglobalprotect-openconnect(Campus VPN @ vpn.byu.edu)variety(wallpaper background changer/manager)jetbrains-toolboxSpotify(may need to run this command multiple times for it to fully download. Try it 5 times before becoming concerned)Pithos(pandora client without ads) -> You may need to change/etc/libao.confto read
default_driver=pulse
instead of
   default_driver=alsa
   dev=default
The same goes forpianobarPianobarlibreoffice-freshwps-officelinux-headers(get the one that matches the MANJARO kernel version. You can tell your kernel by runninguname -r)vmware-workstationvisual-studio-code-binopencv(for howdy)python-opencv(for howdy)python-dlib(for howdy)howdydisplaylink(enable it too. For docks and monitors)displaylink-connectblueman(extra bluetooth settings and capabilities)zoomvirtualbox-host-dkms(needslinux-headersfirst)virtualboxlinux<kernel number>-virtualbox-host-moduleslinux<kernel number>-virtualbox-guest-modulesvirtualbox-ext-oraclemanjaro-grub-theme-sunsetormanjaro-grub-theme-blurred(changes the way GRUB looks)manjaro-gdm-tweak(still not really sure what this does to gdm)gdm-tools-git- Then use
set-gdm-themelist to see all the possible themes you can set. Pick one. (Matcha themes work best) - Set theme and background with this format…
set-gdm-theme -s Matcha-dark-azul ./Pictures/Wallpapers/space-arch.jpg
- Then use
remmina(notice the plugins too)remmina-plugin-teamviewerxterm(allows for scripts to open new windows)teamviewer(for remote access when not logged in already)realvnc-vnc-viewer(like teamviewer)realvnc-vnc-server(if you’d want to connect to your computer via this service instead of teamviewer or normal rdp. Needsxterm)xdotool(can run keyboard shortcuts through command line)- gestures (use
xdotool key <key combo>for the keyboard shortcuts linked to each gesture) wmctrl(interact with windows through command line)bluez-utils(needed for bluetooth gnome extension)system-config-printer(needed to add printers in gnome-settings)macchanger(cli tool for changing mac addresses)debtap(cli tool for turning .deb files into installable Arch Linux files. After it’s installed, runsudo debtap -uto complete install)zerotier-one(connect to virtual private network with your other computers)zerotier-gui-gitpiavpn-bin(Private Internet Access VPN. Subscription service)gitahead(graphical git manager)bitwarden(password manager)ClamAV(AntiVirus)ClamTK(GUI for Clam AntiVirus)steghide(steganopgraphy tool)clonezilla(partition and hard drive tool)k3b(cd/dvd burning/formatting tool)transcode(needed for k3b)neofetch(cmd application to list system specs)nextcloud-clientbpytop(system management cli tool)calibre(ebook reader, library organizer, epub/pdf converter)digikam(photo management engine)deja-dup(backup engine)transmission(torrent downloader)librewolf-bin(firefox based privacy browser)- Put
about:Configin the search bar, search forsecurity.ssl.require_safe_negotiationand set it tofalse. If this isn’t done, pages like BYU’s CAS won’t load.
- Put
lutris(gaming platform)fluent-reader (rss feed reader)lbry(youtube replacement)Krita(drawing)Ardourand/orAudacity(audio editing)app-outlet-bin(App store for flatpaks, snaps, app images)Atom(text editor, simple IDE)Ulauncher(set shortcut to be alt+space like it is on a mac)etcher(easily make bootable usbs)notepadqqdarktable(photo editing)kcolorchooserpdfsamtmuxocrmypdf(need to run pacman -S tesseract-data-eng python-sortedcontainers as well)xbrowsersync(firefox, brave, chrome extensions for cross platform bookmarks)gnome-terminal-transparency(adds transparency to gnome-terminal, which is ok to replace)touchegg(gestures recognizer) → use in conjunction with X11 Gestures Gnome Extension if not using Wayland to get things like 3 finger swipes.teams-for-linux(Microsoft Teams)emote(can be installed withsudo pamac install emote)themix-full-git(used to make themes)tlpandtlpui(laptop power management,enablethis)discordDocker-Desktopfrom the docker website. Aftes its installed, run…
gpg --generate-key
# insert pub key in this next command
pass init <7865BA9185AFA2C26C5B505669FC4F36530097C2>
echo <USER>:10000:65536 >> /etc/subuid
echo <USER>:10000:65536 >> /etc/subgid
systemctl --user restart docker-desktop
Theme recommended packages
canta-gtk-theme-gitVimix-icon-theme(use for cursor)flatery-icon-theme-gitskeuos-gtk-theme-gitmidnight-gtk-theme-git(use for applications)candy-icons-git(use for icons)material-black-colors-theme(use for shell)- Enchanted Sounds (get on gnome-look.org)
- Smooth Sounds (get on https://gnome-look.org ) (use for sound)
Favorite Gnome Extensions (found on extensions.gnome.org)
- Add to Desktop
- Animation Tweaks (changes speeds of animations)
- AppIndicator and KStatusNotifierItem Support
- ArcMenu (set shortcut to be winkey on mouse)
- Bluetooth Quick Connect (needs
bluez-utils) - Clipboard Indicator
- Dash to Dock
- Dash to Panel
- Desktop Icons NG (DING)
- GSConnect
- GTK Title Bar (optionally hides title bar for all apps [except GTK apps] in different states [maximized, tiled, etc])
- Hibernate Status Button
- Horizontal Workspaces
- Just Perfection (turns off certain animations)
- Launch new instance
- Lock Screen Background
- Native Window Placement
- Notes (You need to move the note very slowly when resizing for moving the note. I don’t think it can recognize mouse acceleration)
- Notification Timeout
- Optimus Manager Indicator
- Pamac Updates Indicator
- Removable Drive Menu
- Sound Input & Output Device Chooser OR Audio Switcher 40
- Task Widget
- Transparent Notification
- Transparent Top Bar (Adjustable Transparency)
- Unblank Lockscreen
- User Themes
- Workspace Isolated App Switcher
- Window is ready notification remover
- Window Navigator
- X11 Gestures
- you2ber (needs
ffmpegto work)
Go into “Layouts” > Settings and remove Manjaro Branding → This will allow you to remove or update existing “manjaro-gnome-assets” such as “Dash to Panel” and “Dash to Dock” which may not work properly until updated. You can remove preinstalled extensions with Pacman and restore them with extensions.gnome.org
Configure VNC, RDP, SSH, and SAMBA in Gnome-Settings
- Edit
/etc/samba/smb.confto have this in the[global]section…
client min protocol = CORE
server min protocol = CORE- Restart samba with
sudo systemctl restart smb- Go to gnome-settings > Sharing, and turn all of them (except for media sharing) on. Create your passwords for these now!
- This will turn on SSH, Remote Desktop, and Samba file sharing.
- You can now remote into this computer using the Screen Sharing password and the VNC protocol.
Remminais a good tool for this.
sudo smbpasswd -a <your username>- ^ This sets the password for file sharing. When you mount a smb share you’ll use your username and the password you set here.
- Share whatever folders you want to (like your home folder) by right clicking on it in Nautilus > Sharing Options and setting a name for them.
- You can access these file shares now by going (on another computer) to
smb://<ip address or hostname>/<name of share>Configure RDP through TeamViewer/Real-VNC
This is what you’ll want to do if you want to log in remotely and don’t have access to the computer. (Working from home, accessing a laptop that’s shut, and accessing a computer that has no one logged in!)
You could use this to just log in and then use gnome-remote-desktop after that if you like. This is just to get into a real session on the remote computer so that we can control that session.
Make sure Wayland is disabled and you’ve rebooted since then. You can simply change this line in /etc/gdm/custom.conf
WaylandEnable=falseYou can make sure you’re on X11 instead of Wayland in the About portion of gnome-settings.
For TeamViewer…
- Install & start TeamViewer daemon
yay teamviewer

sudo systemctl start teamviewerd && sudo systemctl enable teamviewerd- Make an account or login in the TeamViewer application and add this computer to your personal computers.
- Go to settings
- Start TeamViewer with System
- Accept incoming LAN connections
- Assign to account
- Make sure you’re granted easy access
- Make a password
- Change password strength to 10 characters
- Whitelist the email for your account and block everyone else.
- Send key combinations
- Generate new password after each session
- Require admin rights to change these settings (use hs password)
For RealVNC…
- Install
realvnc-vnc-serverandrealvnc-vnc-viewer - Open both an follow their directions
- Make an account or sign in
- Connect to one computer from the other. It should be pretty self explanatory.
Configure OneDrive and Dropbox
After installing the dropbox packages (see list above in this article), open a terminal and run
dropboxYou’ll then follow the terminal’s directions to log in. Once done, it will start syncing your Dropbox folder. Dropbox will also add itself to the Startup Applications, which is nice.
Now run
onedriveFollow the directions here and log in as well. It will then start syncing your OneDrive folder when successful.
This next command will make it start on login
systemctl enable --user onedrive_trayConfigure Spotify for Hi-dpi (4K) Screens
sudo cp /usr/share/applications/spotify.desktop /usr/share/applications/spotifyHiDPI.desktop- This will create a new Spotify desktop file (so it will look like 2 instances of Spotify are installed)
sudo nano /usr/share/applications/spotifyHiDPI.desktop- Change the
Exec=spotify %Uline to readExec=spotify --force-device-scale-factor=1.5 %U - Change the
Name=Spotifyline to readName=Spotify HiDPI - Save the file
Configure VMware Workstation
You should have installed vmware-workstation from the AUR using Yay already. We did this because I’ve noticed that the downloadable .bundle file has an issue loading the vmmon and vmci modules between reboots. To avoid having to run sudo modprobe -a vmw_vmci vmmon OR vmware-modconfig --console --install-all every time you boot, just get it from the AUR using Yay.
Enable 3D acceleration with
sudo nano .vmware/preferencesand add
mks.gl.allowBlacklistedDrivers = "TRUE"to the end of the file. Then run
sudo modprobe -a vmw_vmci vmmonThis will load the Kernel Modules needed. Then start and enable all the daemons with
sudo systemctl enable vmware-networks && \
sudo systemctl start vmware-networks && \
sudo systemctl enable vmware-usbarbitrator && \
sudo systemctl start vmware-usbarbitrator- Go into vmware workstation now and change these settings in edit > preferences.
- Turn on all shared folders by default
- Turn on normal updates
- Now open vmware as sudo
sudo vmware- Go to edit > preferences
- Turn on VMware tools updates
- You could play with the “additional memory” if not much RAM is available.
Configure VirtualBox
- Install all the VirtualBox packages from above
sudo modprobe vboxdrv vboxnetadp vboxnetflt- This loads the kernel modules you’ll need.
- If the VirtualBox extensions aren’t installed automatically, you can download them from VirtualBox’s website and import them with preferences > extensions.
Set up howdy facial recognition
pip3 install opencv-pythonsudo howdy config- The infrared camera is possibly
/dev/video2and should read
device_path=/dev/video2- Accuracy should be 3~4
- Timeout could be 2~4
sudo howdy testIf there are gstreamer warnings in the shell when you run that command, then add OPENCV_LOG_LEVEL=ERROR to the end of /etc/environment and reboot.
sudo howdy addThis will add your face to its registry.
Now you must add this next line to the tops of certain /etc/pam.d files.
auth sufficient pam_python.so /lib/security/howdy/pam.pyFiles to add it to in /etc/pam.d/:
gdm-password(optional, will not unlock keyring. It’s seen on gdm login)polkit-1(the admin prompt popups)susudo- (This is not a comprehensive list, you can try it out on other files!)
Note that if you change any of the gdm pam.d files, you’ll still need to put in a password when you first log in to unencrypt the key ring. This can be overridden, but it is not smart… It will store all your passwords in clear text!
Install an AntiVirus
- Make sure
ClamAVandClamTKare installed
sudo systemctl start clamav-freshclam
sudo systemctl enable clamav-freshclam
^ This will start a daemon that will refresh your database of what is considered evil
Here’s an example of how Clam AntiVirus is used..
clamscan --infected --remove --recursive /home/<username>/- –infected: prints only infected files
- –remove removes infected files
- –recursive: all sub-directories in the directory will be scanned
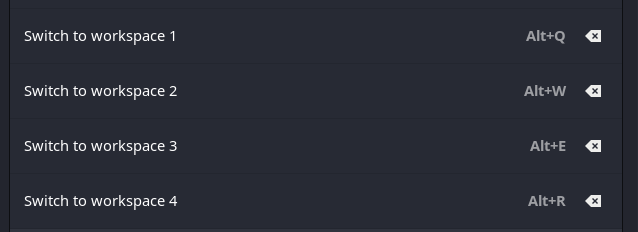
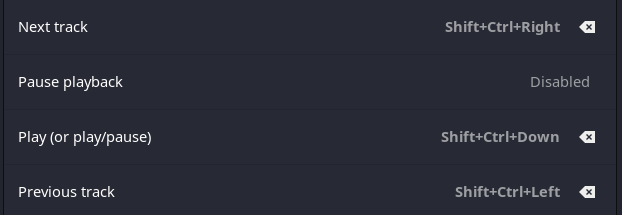
Other Recommended Keyboard Shortcuts
This is all done in the Custom Keyboard Shortcuts in gnome-settings
- Restarting gnome-shell if your gui or extensions ever need restarting ->
killall -a gnome-shell - Brave or chrome ->
brave, google-chrome - Screenshot with gnome screenshot or flameshot ->
flameshot gui. Or set the “copy the screenshot of an area to the clipboard” part of the default keyboard shortcuts - Spotify ->
spotify spotify --force-device-scale-factor=1.5 - Restart Bluetooth ->
sudo systemctl restart bluetooth - Restart NetworkManager ->
sudo systemctl restart NetworkManager - Audio playback controls (ctrl+shift+arrow keys)
- Navigation controls for windows (might have to turn off horizontal workspaces)
- FOR LAPTOPS:
- Kill all battery killing apps.
- Make a script in
~/.local/bincalledkillbatterysuckingappsand make it executable. Fill it with content like this…
killall -1 slack
killall -1 mailspring
killall -1 onedrive_tray
killall -1 dropbox
killall -1 remmina
killall -1 rambox
killall -1 nextcloud
killall -1 jetbrains-toolbox- Map it to a keyboard shortcut and run it any time you’re on battery power.
Installing Printers
- Make sure
system-config-printeris installed. - Option 1 (recommended): (username will be displayed on pages when printing)
- Visit https://localhost:631 where CUPS is running.
- Add printer through Administration > Add Printer.
- Add the printer via Internet Printing Protocol (ipp)
- Find the IP address of the printer and add it via this format:
ipp://10.5.43.2455. Give it a Generic PDF Printer driver for large smart printers that will be printing PDFs frequently. This seems to be some of the the only ones with color and double sided printing capabilities. It may be a good idea to have the same printer but with a Generic PCL Color Laser PS driver. For smaller or older printers, find something close to the same name as the printer and play with the settings.
6. Change double-sided printing options and more in gnome-settings > printers > settings icon > printing options.
- Option 2: Add through network search (username may not is displayed when printing)
- Add the printer in gnome-settings through the network. If will automatically give it a driver that you cannot use (maybe a Generic Text-Only driver)
- Printer Details > Select from database > Generic > Select the Generic PDF Printer or Generic PCL Color Laser PS. These seem to be some of the only ones with color and double sided printing capabilities. For smaller or older printers, find something close to the same name as the printer and play with the settings.
- Printing Options > Two sided printing and other options are here.
My Keyboard Shortcuts


Good Scripts to Have
/usr/bin/update-joplin
wget -O - https://raw.githubusercontent.com/laurent22/joplin/dev/Joplin_install_and_update.sh | bash/usr/bin/update
sudo pacman-mirrors --fasttrack 5
sudo pacman -Sc --noconfirm
sudo npm install npm@latest -g
sudo pacman -Syyu
/usr/bin/killallbatterysuckingapps
# Kill apps
killall pia-client
killall -1 slack
killall -1 onedrive_tray
killall -1 dropbox
killall -1 remmina
killall -1 rambox
killall -1 nextcloud
killall -1 jetbrains-toolbox
killall -1 teams-for-linux

bluetooth off

# mute speakers and mic
amixer set Master mute
amixer set Capture nocap

# Drop Brightness
i="0"
while [ $i -lt 20 ]
do
	gdbus call --session --dest org.gnome.SettingsDaemon.Power --object-path /org/gnome/SettingsDaemon/Power --method org.gnome.SettingsDaemon.Power.Screen.StepDown
	i=$[$i+1]
# 	sleep 0.01

done